How To Host Your Own MQTT For Your Meshtastic Nodes
Integrating MQTT with Meshtastic extends off-grid communication by bridging distant networks. This enables global messaging, provides a backup when mesh signals are weak, and ensures faster message delivery via the internet. Perfect for remote areas and emergency situations.
Meshtastic is an off-grid communication device that enables users to send messages without relying on traditional internet or cellular networks. It utilizes mesh networking, allowing messages to hop from one device to another until they reach their destination. This capability is invaluable for communication in remote areas, during outdoor adventures, or in emergency situations where conventional communication infrastructure is unavailable.
 Adrelien
What is MQTT in Meshtastic?
MQTT in Meshtastic is a protocol that allows your nodes to send messages over the internet when they are out of radio range. It bridges your local mesh to the global map.
While Meshtastic excels at local off-grid communication, there may be scenarios where you need to connect groups that are geographically separated by significant distances, such as in different parts of the world. Additionally, there may be situations where you do not have a direct signal to the mesh network but still want to communicate. This is where MQTT (Message Queuing Telemetry Transport) can play a crucial role.
MQTT is a lightweight messaging protocol designed for low-bandwidth, high-latency, or unreliable networks. By integrating MQTT with Meshtastic, you can create a gateway device that serves as a bridge between two or more distant Meshtastic networks and also provide a backup communication path when the mesh signal is weak or unavailable. Here’s how this works in detail:
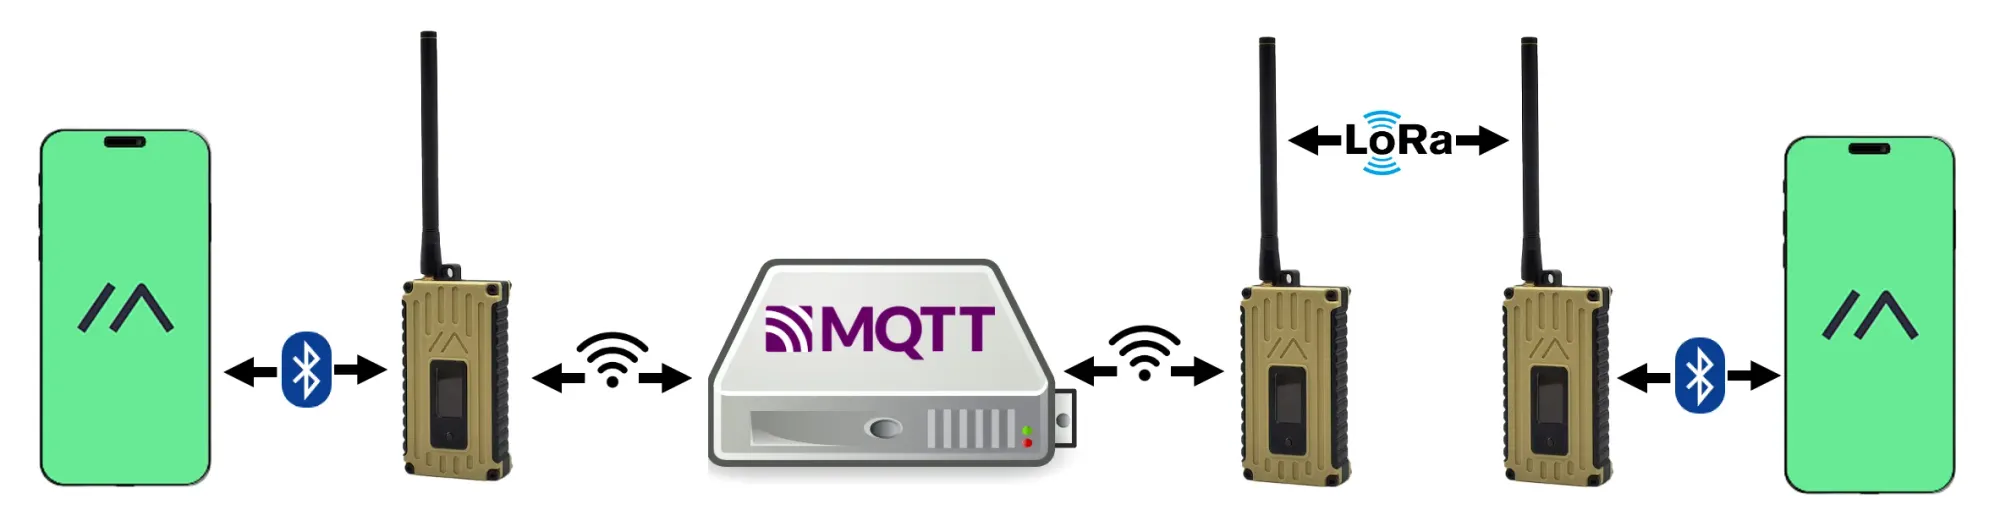
- Local Communication: Each group, using Meshtastic devices, can communicate freely within their local mesh network. This means that devices in Group A (located in one part of the world or far community) can send messages to each other without any internet or Wi-Fi connection. The same applies to Group B in another location.
- Gateway Device: To connect these two groups, a Meshtastic device/s (More than one device can act as a gateway for redundancy) within each group can be designated as a gateway. This gateway device will have an additional connection to the internet or a local network capable of running an MQTT broker.
- MQTT Integration: The gateway device in Group A connects to an MQTT broker (a server that routes messages between MQTT clients). This broker can be hosted on a local server or a cloud service. The gateway device publishes messages from the local mesh network to a specific MQTT topic. Similarly, it subscribes to another topic to receive messages from the MQTT broker.
- Message Relay: The MQTT broker acts as an intermediary. When the gateway device in Group A publishes a message to the MQTT topic, the MQTT broker receives it and then forwards it to the gateway device in Group B, and vice versa. This allows messages to be relayed between the two groups despite the vast distances separating them.
- Global Communication: Through this setup, Group A and Group B can now communicate with each other as if they were part of the same local network. The use of MQTT as a bridge ensures that messages are efficiently transmitted between the two distant groups, leveraging the strengths of both Meshtastic for local communication and MQTT for long-range message relaying, creating a versatile and powerful communication network.
- Backup Connection: In cases where there is no signal to the mesh network or the mesh signal is weak, the MQTT gateway provides a reliable backup connection. This ensures continuous communication even when the primary mesh network is not available.
- Faster Messaging: MQTT messages can be transmitted much faster over the internet compared to the mesh network. During times when internet access is available, MQTT can offload some of the traffic from the mesh network, ensuring faster and more efficient message delivery.
Adrelien
How to Install MQTT with Docker
1. Install Docker
First, you'll need to install Docker. The latest instructions are available on the Docker website. Alternatively, you can use the following script to install Docker:
curl -fsSL https://get.docker.com -o get-docker.sh
sh get-docker.sh
2. Create a Base Folder for MQTT Configuration
Create a directory to hold your MQTT configuration files:
mkdir mqtt5
cd mqtt5
mkdir config
This setup will store the mosquitto.conf file and the pwfile for password management.
3. Create the Mosquitto Configuration File
Create the Mosquitto configuration file:
nano config/mosquitto.conf
Add the following basic configuration content, including WebSocket support:
allow_anonymous false
listener 1883
listener 9001
protocol websockets
persistence true
password_file /mosquitto/config/pwfile
persistence_file mosquitto.db
persistence_location /mosquitto/data/
4. Create the Mosquitto Password File
Create an empty password file:
touch config/pwfile5. Create the Docker-Compose File
Create a docker-compose.yml file with the following content:
nano config/mosquitto.conf
nano docker-compose.yamlversion: "3.7"
services:
mqtt5:
image: eclipse-mosquitto
container_name: mqtt5
ports:
- "1883:1883" # Default MQTT port
- "9001:9001" # MQTT port for WebSockets
volumes:
- ./config:/mosquitto/config:rw
- ./data:/mosquitto/data:rw
- ./log:/mosquitto/log:rw
restart: unless-stopped
6. Create and Run the Docker Container for MQTT
If you don't have Docker Compose installed, you can install it with:
sudo apt install docker-compose
Run the Docker container:
sudo docker-compose up -d
Check if the container is running and note the container ID:
sudo docker ps
7. Create a User/Password in the pwfile
Log in interactively to the MQTT container:
sudo docker exec -it <container-id> shCreate a new password file and add a user (it will prompt for a password):
mosquitto_passwd -c /mosquitto/config/pwfile user1To add additional users (without the -c option):
mosquitto_passwd /mosquitto/config/pwfile user2To delete a user:
mosquitto_passwd -D /mosquitto/config/pwfile <user-name-to-delete>
Exit the container:
exit
Restart the container to apply changes:
sudo docker restart <container-id>How to Install MQTT on Windows
1. Download and Install Mosquitto
Download the Mosquitto installer from the official Mosquitto website. Run the installer and follow the on-screen instructions.
2. Configure Mosquitto
After installation, configure Mosquitto:
- Navigate to the Mosquitto installation directory (usually
C:\Program Files\Mosquitto). - Open
mosquitto.confin a text editor and configure it as needed. You can use the same configuration settings as mentioned earlier for Docker.
allow_anonymous false
listener 1883
listener 9001
protocol websockets
persistence true
password_file /mosquitto/config/pwfile
persistence_file mosquitto.db
persistence_location /mosquitto/data/
3. Start Mosquitto
Start Mosquitto using the command prompt:
cd "C:\Program Files\Mosquitto"
mosquitto -c mosquitto.conf
How to Install MQTT on Linux
1. Install Mosquitto
Install Mosquitto using your package manager:
sudo apt install mosquitto2. Configure Mosquitto
Edit the Mosquitto configuration file:
sudo nano /etc/mosquitto/mosquitto.confAdd the following configuration:
bashCopy codeallow_anonymous false
listener 1883
listener 9001
protocol websockets
persistence true
password_file /etc/mosquitto/pwfile
persistence_file mosquitto.db
persistence_location /var/lib/mosquitto/
3. Create the Password File
Create a password file and add a user:
touch /etc/mosquitto/pwfile
sudo mosquitto_passwd -c /etc/mosquitto/pwfile user1
4. Start Mosquitto
Start the Mosquitto service:
sudo systemctl start mosquitto
sudo systemctl enable mosquitto
Settings for Meshtastic
Once your MQTT broker is running, configure your Meshtastic nodes to connect to it:
- Go to Settings
- Then MQTT
- Enabled: Enable the MQTT module.
- MQTT Proxy Enabled: Let the device use the phone's network connection to connect to the MQTT server.
- Encryption Enabled: Enable this if you want encrypted packets.
- JSON Disabled: For our use, we will disable JSON packet support for easy integration with other systems.
- Map Reporting Enabled: Periodically send a map report to the MQTT server.
- Map Report Publish Interval: Set how often the map report is published.
- Map Report Position Precision: Set the precision for the position in the map report.
- Root Topic: Set a root topic for organizing your MQTT messages. ' msh/mymesh
- Server Address: Set the address of your custom MQTT server.
- Username: The username for your MQTT server.
- Password: The password for your MQTT server.
- TLS Enabled: TLS for a secure connection if you have configured SSL certificates on your server. For this tutorial, we will disable it for now.
- Go back to settings
- Then Channels
- Choose the channel you want to enable MQTT for, Enable Uplink/Downlink
Integrating MQTT with Meshtastic significantly enhances the capabilities and versatility of off-grid communication networks. Meshtastic excels at facilitating local communication through mesh networking, ensuring robust and reliable message delivery even in the absence of traditional internet or cellular connectivity. However, by incorporating MQTT, you can bridge geographically dispersed Meshtastic networks, enabling seamless global communication.
MQTT serves as a lightweight, efficient messaging protocol that operates well over low-bandwidth and high-latency networks. This makes it an ideal choice for connecting Meshtastic networks across vast distances. The integration involves setting up a gateway device within each local mesh network that connects to an MQTT broker, allowing messages to be relayed efficiently between distant groups.
This setup not only extends the reach of Meshtastic networks but also provides a reliable backup communication path when the mesh signal is weak or unavailable. Additionally, MQTT can expedite message delivery during times when internet access is available, offloading some traffic from the mesh network and ensuring faster communication.
By leveraging both Meshtastic and MQTT, users can maintain continuous, reliable communication across local and global scales, making this combined solution invaluable for remote areas, outdoor adventures, and emergency situations. This integration effectively marries the strengths of local mesh networks with the global reach of MQTT, creating a powerful and resilient communication network.