Things To Watch Out For Building Your First FPV Drone
Building your first FPV drone? Navigate the challenges with our comprehensive guide. Learn about regulations, component selection, assembly, and more for a successful build.
First Person View (FPV) drone racing and freestyle flying have skyrocketed in popularity in recent years, captivating enthusiasts with adrenaline-fueled action and breathtaking aerial maneuvers. As drones equipped with FPV gear zip through elaborate racecourses or perform gravity-defying stunts in the air, they offer spectators and pilots alike a thrilling glimpse into the world of high-speed, immersive flight.
Building your first FPV drone opens the door to an exhilarating hobby filled with excitement and challenges. It's not just about assembling a machine; it's about crafting a personalized flying experience that puts you in the pilot's seat, soaring through the sky with unparalleled freedom.
However, embarking on the journey of building your own FPV drone comes with its own set of challenges and potential pitfalls. From selecting the right components to mastering the intricacies of FPV system setup and tuning, there are many factors to consider to ensure a successful build and, ultimately, an exhilarating flying experience. By being aware of these potential pitfalls and taking proactive steps to address them, you can set yourself up for a rewarding journey into the world of FPV drone racing and freestyle flying.
 Adrelien
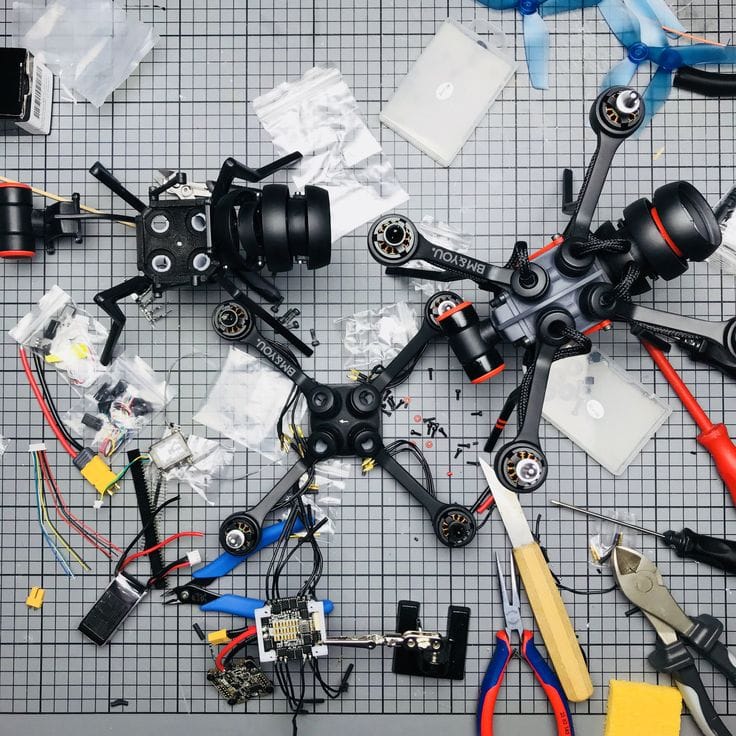
Frame:
- Size: Choose a frame size that suits your intended use, whether it's racing, freestyle, or aerial photography. Larger frames offer stability and payload capacity, while smaller frames prioritize agility and speed.
- Material: Opt for materials like carbon fiber for lightweight yet robust frames that can withstand crashes and impacts.
- Mounting Holes: Ensure the frame matches the mounting sizes for securing the flight controller (FC), electronic speed controllers (ESCs) Stack (Ex 30x30 or 20x20), motors (Ex 9mm or 12mm), FPV camera (Ex 20mm or 19mm), and other components. Look for frames with versatile mounting patterns to accommodate various configurations.
Choosing the Right Frame Size
Frames are categorized primarily by their size, typically measured diagonally from motor to motor. This size determines what type of drone you are building and its potential applications:
- Whoop Frames: These tiny frames are usually about 2.5 to 3 inches in size and are perfect for indoor flying. They are lightweight and generally used for small, brushed motors, making them ideal for beginners and indoor racing enthusiasts.
- Micro Frames: Ranging from about 4 inches to 7 inches, these frames are suitable for outdoor flying but are still small enough to be nimble and agile. They can accommodate both brushed and brushless motors and are great for pilots who want a balance between a whoop's indoor manageability and a larger drone's capabilities.
- Mini Frames: Typically between 7 inches to 10 inches, mini frames are the most popular for FPV racing and freestyle flying. They provide enough space to house powerful motors and larger batteries but are still compact enough to ensure agility and speed.
- Standard Frames: These range from 10 inches to 18 inches and are commonly used for recreational and cinematic purposes. They can carry larger and more powerful motors along with heavier payloads, such as more sophisticated cameras and additional hardware.
- Large Frames: Anything over 18 inches falls into this category. These frames are usually used for professional-grade cinematography or specialized industrial applications. They are capable of carrying significant payloads, including high-end cameras and other equipment.
Flight Controller (FC) & Electronic Speed Controllers (ESC):
- Compatibility: Verify compatibility between the FC and ESCs, ensuring they support the same communication protocols and firmware, better to opt for Stack or AIO. Check for mounting hole compatibility with the frame and sufficient current rating on the ESCs to handle the motor's power demands.
- Features: Look for FCs with integrated gyroscopes and accelerometers for stable flight performance. Consider features like Betaflight compatibility for advanced tuning options and onboard OSD (on-screen display) for real-time flight telemetry.
Common sizes for these mounting patterns include:
- 30.5x30.5 mm: This is a standard size for many larger drones, providing a stable base for the FC and often additional room for integrating other components.
- 20x20 mm: More compact and typically used in smaller drones, this mounting size is ideal for micro and mini frames where space is at a premium.
- Whoop-size boards: Specifically designed for tiny whoop class drones, these are even smaller and integrate directly into the drone's tiny frame.
Adrelien
Motors & Propellers:
- Motor Size & KV Rating: Choose motors that match the frame size and desired flight characteristics. Higher KV ratings provide more RPM per volt and are suitable for lightweight builds, while lower KV ratings offer higher torque for larger props and payloads.
- Propeller Size: Match propeller size to the motor's thrust capabilities and the desired flight performance. Consider factors like blade count (bi or tri props), and for optimizing efficiency and maneuverability. Also, ensure that the propellers fit your frame—too big and they'll hit the frame or each other, too small and you'll lack power.
Motor Recommendations for Different Drone Sizes
The size of a drone motor is typically indicated by a four-digit number – for example, 1404. These numbers reveal the motor's dimensions:
- The first two digits represent the diameter of the motor’s stator in millimeters.
- The last two digits describe the height of the stator in millimeters.
A larger stator means more torque, which can spin larger propellers but may result in increased power consumption and weight. A smaller motor, meanwhile, is lighter and consumes less power but might not offer as much lift or speed.
- Whoop Frames (2.5 to 3 inches): These small drones perform best with high KV motors due to their light weight and smaller propellers. Motor sizes like 0802 or 1103 with a KV rating of 15000-25000 are common, providing quick responsiveness for indoor flight.
- Micro Frames (4 to 7 inches): Micro frames balance agility and power, needing motors that offer a good midpoint. A motor size of 1404 to 1806 with KV ratings between 4000 to 6500 KV would be effective, allowing for efficient outdoor flight with a good mix of speed and control.
- Mini Frames (7 to 10 inches): Mini frames are popular in FPV racing and require motors that provide a balance between speed and torque. Motor sizes like 2205 to 2306, with KV ratings from 2400 to 2750 KV, are ideal for ensuring performance without sacrificing too much flight time.
- Standard Frames (10 to 18 inches): These larger frames are often used for recreational and cinematic flying, requiring powerful motors to handle heavier payloads. Motor sizes in the range of 2806 to 3210, with lower KV ratings around 800 to 1600 KV, are suitable to support larger propellers and heavier loads effectively.
- Large Frames (over 18 inches): Used predominantly for professional cinematography or industrial applications, these frames need robust motors that can provide substantial lift. Motor sizes like 4210 or larger, with KV ratings below 800 KV, are typically used to maximize efficiency and stability under heavy payloads.
KV Rating of Motors
The KV rating of a motor refers to the number of revolutions per minute (RPM) the motor will make per volt of electricity supplied, without any load. This is an indicator of how fast the motor can spin:
- Higher KV motors spin faster, and are suited for smaller propellers or drones where high speed and agility are needed.
- Lower KV motors have more torque and are better for larger propellers and drones that carry heavier payloads.
Recommended Propeller Sizes for Different Drone Frames
- Whoop Frames (2.5 to 3 inches): These small frames typically use propellers that are 1 to 2 inches in diameter. These tiny propellers are suited for indoor use where space is limited and maneuverability is paramount. They are generally made from plastic due to the lower risk of damage in an indoor environment.
- Micro Frames (4 to 7 inches): For these slightly larger frames, propellers in the range of 3 to 4 inches are common. These propellers strike a balance between efficiency and thrust, suitable for outdoor flying where both performance and battery life are important.
- Mini Frames (7 to 10 inches): Propellers for these frames usually measure between 5 to 7 inches. These sizes offer excellent thrust and agility, making them ideal for FPV racing and freestyle flying. The propellers are often tri-bladed for a good balance of responsiveness and control.
- Standard Frames (10 to 18 inches): For these larger drones, propellers can range from 8 to 15 inches, depending on the specific application and motor capabilities. These larger propellers provide the necessary lift and stability for carrying heavier payloads, such as advanced cameras and sensors.
- Large Frames (over 18 inches): These frames require very large propellers, usually 16 inches or more. These propellers are specifically designed to maximize lift and efficiency for heavy-duty tasks and professional-grade cinematography. Often made from high-strength materials like carbon fiber, these propellers ensure durability and performance at high loads.
Camera & Video Transmitter (VTX):
- Camera Resolution & FOV: Select an FPV camera with high-resolution imaging and a wide field of view (FOV) for immersive flying experiences. Consider factors like low-light sensitivity and dynamic range for capturing clear footage in various lighting conditions. Ensure it matches the frame mounting hole for the camera mount as well.
- VTX Output Power & Frequency Bands: Choose a video transmitter (VTX) with adjustable output power (25mW (Pit Feature) to 800mW) to comply with local regulations and optimize range. Ensure compatibility with your FPV goggles' frequency bands (e.g., 5.8GHz) for seamless video reception.
The power of a VTX, measured in milliwatts (mW), directly affects the range and clarity of the video signal:
- 25mW is often used for indoor racing to minimize interference with other pilots and is suitable for short-range applications or in pit mode for low heat during stops.
- 200mW to 600mW provide an optimal balance for outdoor use, offering extended range without excessive power consumption.
- 800mW or higher is ideal for long-range flights or areas with substantial environmental interference, delivering clearer video over greater distances.
Receiver & Transmitter (Controller):
- Receiver Compatibility: Ensure compatibility between the receiver and your transmitter (controller), considering signal protocols (e.g., FrSky, ELRS) and frequency bands.
- Transmitter Features: Invest in a quality transmitter with ergonomic design, customizable controls, and telemetry support for monitoring battery voltage and RSSI (Received Signal Strength Indication). Consider transmitter power output for extended range and signal penetration.
Communication Protocols
- ACCST (FrSky): FrSky’s ACCST protocol is popular due to its reliability and range. It’s compatible with a wide range of receivers and offers features like telemetry, which provides real-time data from the drone back to the pilot.
- AFHDS (FlySky): AFHDS and its upgrade, AFHDS 2A, are used by FlySky and provide a budget-friendly option with good performance. They are less commonly used in professional settings but are an excellent choice for hobbyists.
- Crossfire (TBS): This protocol, developed by Team BlackSheep, operates on a different frequency (900 MHz) and is renowned for its long range and robust interference handling. It is favored by long-range and freestyle pilots.
- ExpressLRS (ELRS): An open-source protocol that stands out for its ultra-low latency, high reliability, and long range. ELRS is rapidly gaining popularity among those who prioritize robust performance and customization in both racing and long-range FPV drones.
- Transmission Power (TX Power): The power of the transmitter dictates its range. More powerful transmitters can send signals further, which is essential for long-range FPV flights. However, it's important to comply with local regulations regarding transmission power to avoid interference with other devices and legal issues.
- 25mW: This is the lowest commonly used power setting, often used for indoor flying or in situations where regulations restrict power usage to prevent interference with other users. It's suitable for short-range flights.
- 100mW to 200mW: A step up, this range offers increased distance and better signal penetration through obstacles without a significant increase in interference potential. This power setting is adequate for most recreational outdoor flying within visual line of sight.
- 500mW to 1000mW (1W): Higher power settings like these are used for long-range flights or in environments with many obstacles (e.g., dense urban areas). While they provide extensive range, they also require careful handling to avoid breaching local transmission laws.
Battery & Charger:
- Battery Size & Capacity: Choose lithium polymer (LiPo) batteries with the appropriate cell count (e.g., 3S, 4S) and capacity (mAh) for your desired flight time and performance. Balance capacity with weight for optimal power-to-weight ratio and maneuverability.
- Charger Compatibility: Invest in a reliable charger capable of balancing individual cells and supporting various battery chemistries (e.g., LiPo, LiHV). Consider features like adjustable charge rates, storage modes, and safety features (e.g., overcharge protection) for safe and efficient battery management.
Choosing the Right Battery
- Whoop Frames (2.5 to 3 inches): Typically, these use 1S to 2S batteries due to their small size and lower power requirements.
- Micro Frames (4 to 7 inches): These frames commonly use 2S to 4S batteries, balancing power and weight for outdoor agility.
- Mini Frames (7 to 10 inches): A 4S to 6S battery is ideal here, providing the necessary power for competitive racing and freestyle performance.
- Standard Frames (10 to 18 inches): These larger drones often require 4S to 6S batteries, depending on their specific applications and the weight of additional equipment like cameras.
- Large Frames (over 18 inches): Typically, these use 6S batteries or higher to efficiently handle significant payloads and extended flight times.
Connectors and Compatibility
- XT30 and XT60 Connectors: These are the most common types of connectors for FPV drones. XT30 connectors are suitable for smaller drones that do not draw a lot of current, generally used with batteries up to 4S. XT60 connectors, offering the ability to handle higher currents, are standard for batteries from 4S up to 6S. It's essential to match the battery connector with the one pre-installed on your drone's electronic speed controller (ESC) or power distribution board to ensure compatibility and safe operation.
Goggles:
- Display Resolution & FOV: Choose FPV goggles with high-resolution displays and a wide field of view (FOV) for immersive visual experiences. Consider factors like adjustable IPD (interpupillary distance) and diopter lenses for personalized viewing comfort and clarity.
- Comfort & Features: Opt for goggles with ergonomic designs, adjustable head straps, and cushioned faceplates for extended wearing comfort. Look for features like built-in DVR (digital video recording), HDMI input, and customizable OSD for enhanced functionality and usability.
Choosing the right Goggle Type:
- Box Goggles: These goggles have a single large screen inside a box-like enclosure, which the user views through a set of lenses. Box goggles are typically less expensive and can offer a large field of view. Their size and shape provide ample room inside for those who wear glasses. However, they are bulkier and heavier compared to other types.
- Binocular Goggles: These are more compact and feature two small screens (one for each eye), providing a more immersive experience. They tend to be lighter and more comfortable during long flights. Binocular goggles can range from moderately priced to very high-end models featuring HD displays and extensive adjustability options.
Assembly and Wiring
Assembling your FPV drone and wiring its components correctly are critical steps in ensuring its functionality and performance. Here's a step-by-step guide to assembling and wiring your FPV drone, along with common considerations and troubleshooting tips:
- Prepare Your Workspace: Clear a well-lit and clutter-free workspace. Gather all necessary tools and components, including your frame, FC, ESCs, motors, camera, VTX, receiver, transmitter, goggles, soldering iron, solder, wire strippers, and heat shrink tubing. Consider purchasing a bundle of M2 screws of all sizes since not all companies provide them, ensuring you have the necessary hardware for assembly.
- Review Wiring Diagram: Refer to the wiring diagram provided by your FC & ESC stack manufacturer. Familiarize yourself with the layout and connections required for your specific setup.
- Pre-tin Pads: Pre-tin all the pads on your FC and ESCs before soldering. This prepares the surfaces for soldering and makes the process smoother and more reliable.
- Start Soldering: Begin soldering the connections according to the wiring diagram. Start with essential connections such as battery leads, motor wires, and signal wires. Use 60/40 soldering wire, as it's easier to work with and provides good conductivity.
- Unique Wiring Considerations:
- VTX Placement: Mount your video transmitter (VTX) at the back of the drone to minimize interference with other components. Ensure proper ventilation for heat dissipation.
- Antenna Routing: Route antenna cables away from high-current wires and components to prevent signal interference. Twist antenna cables to keep them organized and minimize signal loss.
- Capacitor Installation: Install capacitors on your ESCs to filter electrical noise and prevent voltage spikes that can damage your electronics. It's crucial for smooth and reliable performance, especially during rapid throttle changes.
- Smoker Stopper: Use a smoke stopper (a device that limits current flow) to check for short circuits or incorrect wiring before connecting a battery. This helps prevent damage to your components and reduces the risk of electrical fires.
- Check Connections: After soldering all connections, carefully inspect each joint for proper bonding and continuity. Ensure there are no cold solder joints, loose wires, or shorts between adjacent pads.
- Test Each Component: Power up your FC and test each component individually to verify functionality. Check motor direction and rotation, receiver signal reception, camera and VTX video feed, and transmitter control inputs.
In conclusion, building your first FPV drone is a journey that offers both challenges and rewards. It's an opportunity to delve into a fascinating hobby that combines technology, creativity, and adrenaline-pumping excitement. While there may be hurdles along the way, such as navigating regulations, selecting the right components, and mastering assembly techniques, each step brings you closer to the thrill of taking flight. With determination, patience, and the guidance provided in this guide, you can overcome obstacles and embark on an exhilarating adventure in the world of FPV drone racing and freestyle flying.
Adrelien