SenseCAP Indicator Review: The Meshtastic iPad?
The SenseCAP Indicator by Seeed Studio is a pretty unique Meshtastic device. The first 3.95” touchscreen Meshtastic device! Excellent build quality, and with MUI, it makes a great desk or car node. Dive in for the full review!
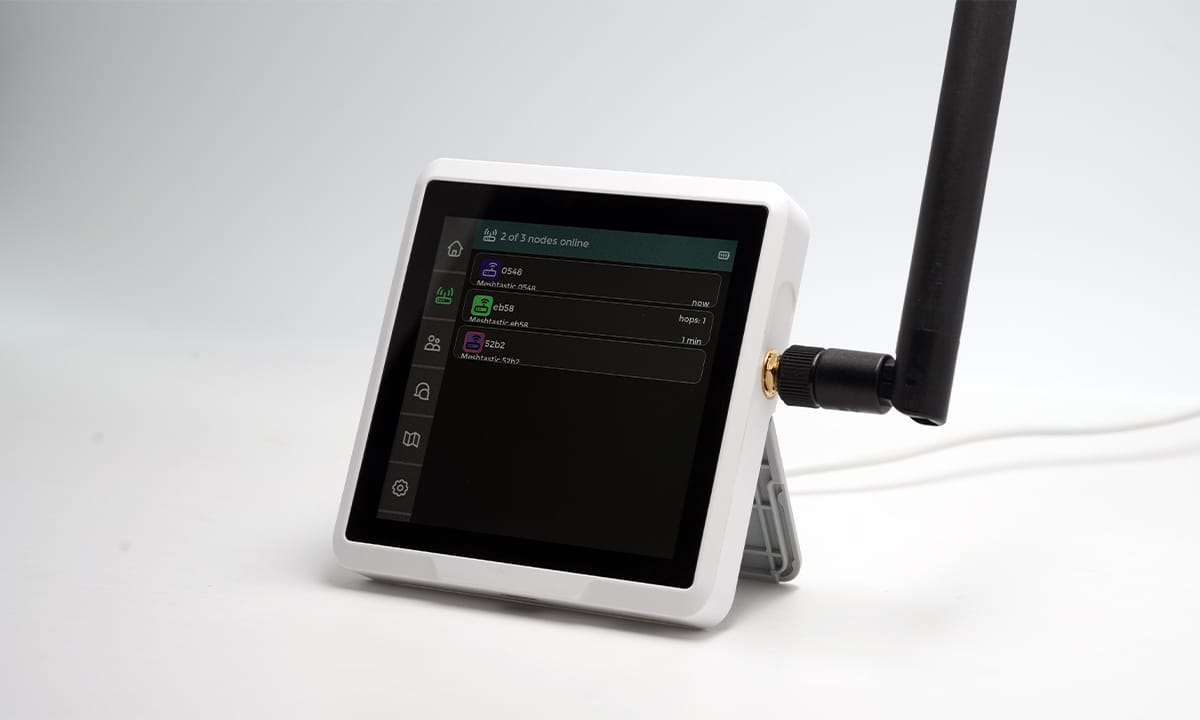
The SenseCAP Indicator by Seeed Studio is a pretty unique Meshtastic device. It’s one of the biggest ones out there with a built-in screen—plus, it’s a full standalone device with a 3.95-inch capacitive RGB touchscreen. Unlike most Meshtastic devices, which are usually just boards or simple enclosures, this one feels more like a finished product. It’s powered by an ESP32 along with an RP2040, giving it plenty of flexibility. In this review, I’ll go over its features, what it does well, where it could be better, and what kind of use cases it’s best suited for.

Unboxing and Initial Impressions
The SenseCAP Indicator comes in well-packaged, neatly wrapped in a sleek box. Right out of the box, the build quality feels solid, and the 3.95-inch capacitive touchscreen is sharp and responsive, making a great first impression. However, there’s no SD card included, so you’ll need to buy one separately if needed.
What's in the box:
- SenseCAP Indicator
- USB-C Cable (1M)
- 2dBi 868-915MHz SMA Antenna
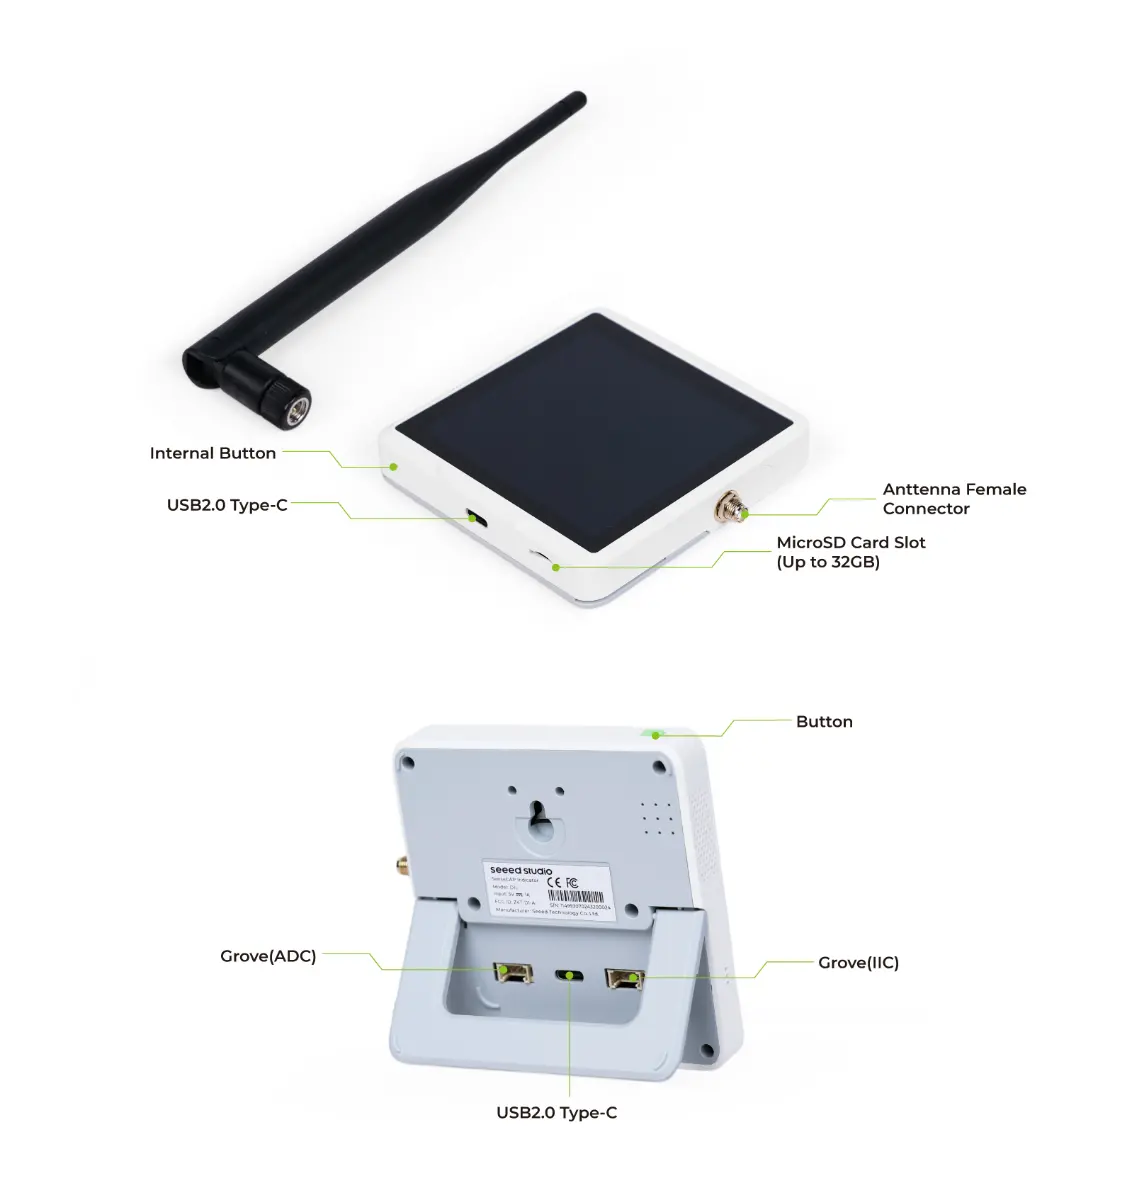
On the back, you'll notice a mounting hole if you plan to attach it to a wall. The device is powered via a USB-C port located on the back, with a second USB-C plug on the bottom alongside the SD card slot and an internal button for additional functions. There’s also a foldable stand, perfect for placing the device on your desk.
The female SMA antenna is located on the side, while the green button is conveniently placed on top. On the back, you’ll find two Grove plugs: one for ADC (Analog to Digital Conversion) and the other for IIC (Inter-Integrated Circuit), offering great flexibility for expanding your setup. The ADC is ideal for connecting analog sensors, while the IIC port is perfect for digital sensor integration, giving you various ways to customize your IoT network.
Features Overview
The SenseCAP Indicator takes a different approach compared to your typical handheld Meshtastic device. It boasts a beautiful 3.95-inch touch screen, paired with the new Meshtastic UI (MUI—not to be confused with Google’s MUI). This makes it an excellent option for a desk, home, or car node. On top of that, you get all the standard ESP32 features, including Wi-Fi and Bluetooth, adding to its versatility. The device also supports an SD card up to 32GB and includes a buzzer, though it’s not yet utilized.
Look for the Bluetooth icon—selecting this will reboot the device into Bluetooth mode without MUI. This is useful if you need to change settings that are not accessible within MUI.
It really shines when used with the new Meshtastic 2.6 software. You get offline maps, tools for scanning and signal analysis and more. The ability to use it as a standalone node, meaning you can send and receive messages directly from the device without needing a phone.
However, it falls short in a few areas. There’s no built-in sensors, no battery (which is a significant drawback in my opinion), and no GPS. It does have two Grove ports—one for I2C and one for ADC—giving you the flexibility to expand its features by adding things like GPS. But for a device that looks as nice as this and is designed to be standalone, I think including a battery and GPS is a must. While you can power it with a decent power bank, if you don’t mind sacrificing screen size and add GPS if you don't care about aesthetic, the T-Deck could be a better choice.
The screen size, touch functionality, and form factor are what really make this device stand out, especially considering its price point. We'll dive into its use cases next.
Flashing the Firmware
Before pairing the device, you need to install the latest Meshtastic firmware:
- Go to Meshtastic Web Flasher.
- Select Seeed SenseCAP Indicator as the target device and choose the latest firmware.
- Press and hold the top button while plugging in the USB-C cable to enter flash mode.
- Enable Full Erase and Install, then click Erase Flash and Install.
- When prompted, select the correct USB serial port (avoid selecting "INDICATOR RP2040").
- Wait for the flashing process to complete. Once done, the device will reboot.
Performance
Screen & Build Quality
The 3.95-inch capacitive touchscreen is one of the standout features of the SenseCAP Indicator. The colors are vibrant, brightness is sufficient for both indoor and outdoor use, and the touch response is snappy and accurate. Build quality is excellent—sturdy, well-finished, and premium-feeling. No complaints in this department.
Range & Connectivity
Now, let’s talk about range. If you’ve read my previous review of the XIAO ESP32S3 node, you’ll know I’ve ranted about this before. The stock 2dBi antenna works, but it’s far from the best. In my tests, range was about half of what I got with the T1000-E, which is disappointing considering T1000-E comes with integrated small antenna.
That said, the good news is that the antenna is easily replaceable. Swap it for a better aftermarket one, and you’ll see a massive range improvement. This makes me wonder: when the T1000-E gets excellent range out of the box, why not just ship the SenseCAP Indicator with a better antenna to begin with?
Usability & Experience
Easy to navigate thanks to the new Meshtastic UI. Bluetooth and WiFi works reliably, Customizable, with one Grove ADC port and one Grove I2C port for expansion. However, adding GPS was not the best experience—the lack of onboard GPS and a built-in battery limits its standalone usability.
Look for the Bluetooth icon—selecting this will reboot the device into Bluetooth mode without MUI. This is useful if you need to change settings that are not accessible within MUI.
I was hoping to call it the iPad of Meshtastic, but without those core features, it falls short. Instead, we’re left with something that’s visually modern but less portable, while the T-Deck—despite being functional—still looks like a BlackBerry from 2006. If the Indicator had built-in GPS and a battery, it could truly be the premium standalone Meshtastic device.
Pricing
The SenseCAP Indicator is priced at $47.90, and while we’ve ranted a lot about the missing battery and onboard GPS, it’s still not a bad deal for what you get.
Let’s break it down:
- A big, beautiful touchscreen (much nicer than the T-Deck’s tiny display) that’s bright and highly responsive.
- Two MCUs—RP2040 and ESP32, which means more flexibility if you ever want to repurpose it beyond Meshtastic. Sure, Meshtastic mainly uses the ESP32, but having an extra MCU is always interesting.
- Swappable antenna, so you can upgrade it for better range (which, honestly, is something Seeed should’ve done out of the box).
- Two Grove expansion ports (ADC and I2C) to add extra hardware—though adding GPS wasn’t the smoothest experience.
- A solid case and sleek design right out of the box. No 3D printed box or anything needed
Now, let’s compare it to the T-Deck—which also lacks GPS and doesn’t come with a case—and costs $50+ without a battery. Yes, the T-Deck is better as a handheld standalone device, but for a desktop or car-mounted node, the SenseCAP Indicator feels like the "iPad of Meshtastic" compared to the BlackBerry-looking T-Deck.
Expandability
The SenseCAP Indicator is primarily a display and interface device, but it does offer some customization options.
First, it features an external female SMA connector, allowing you to swap out the stock antenna for an aftermarket one with better performance. This is great, considering the default range is about half that of the T1000-E, but easily upgradable.
In terms of hardware expansion, the device includes two Grove connectors:
- One ADC (Analog-to-Digital Converter)
- One I2C (Inter-Integrated Circuit)
Now, while two Grove connectors might not seem like much compared to something like the XIAO ESP32S3, it still provides some flexibility. The problem is how these connectors interact with the device. Unlike the XIAO, where Grove connectors interface directly with the ESP32, here they are wired to the RP2040, not the ESP32.
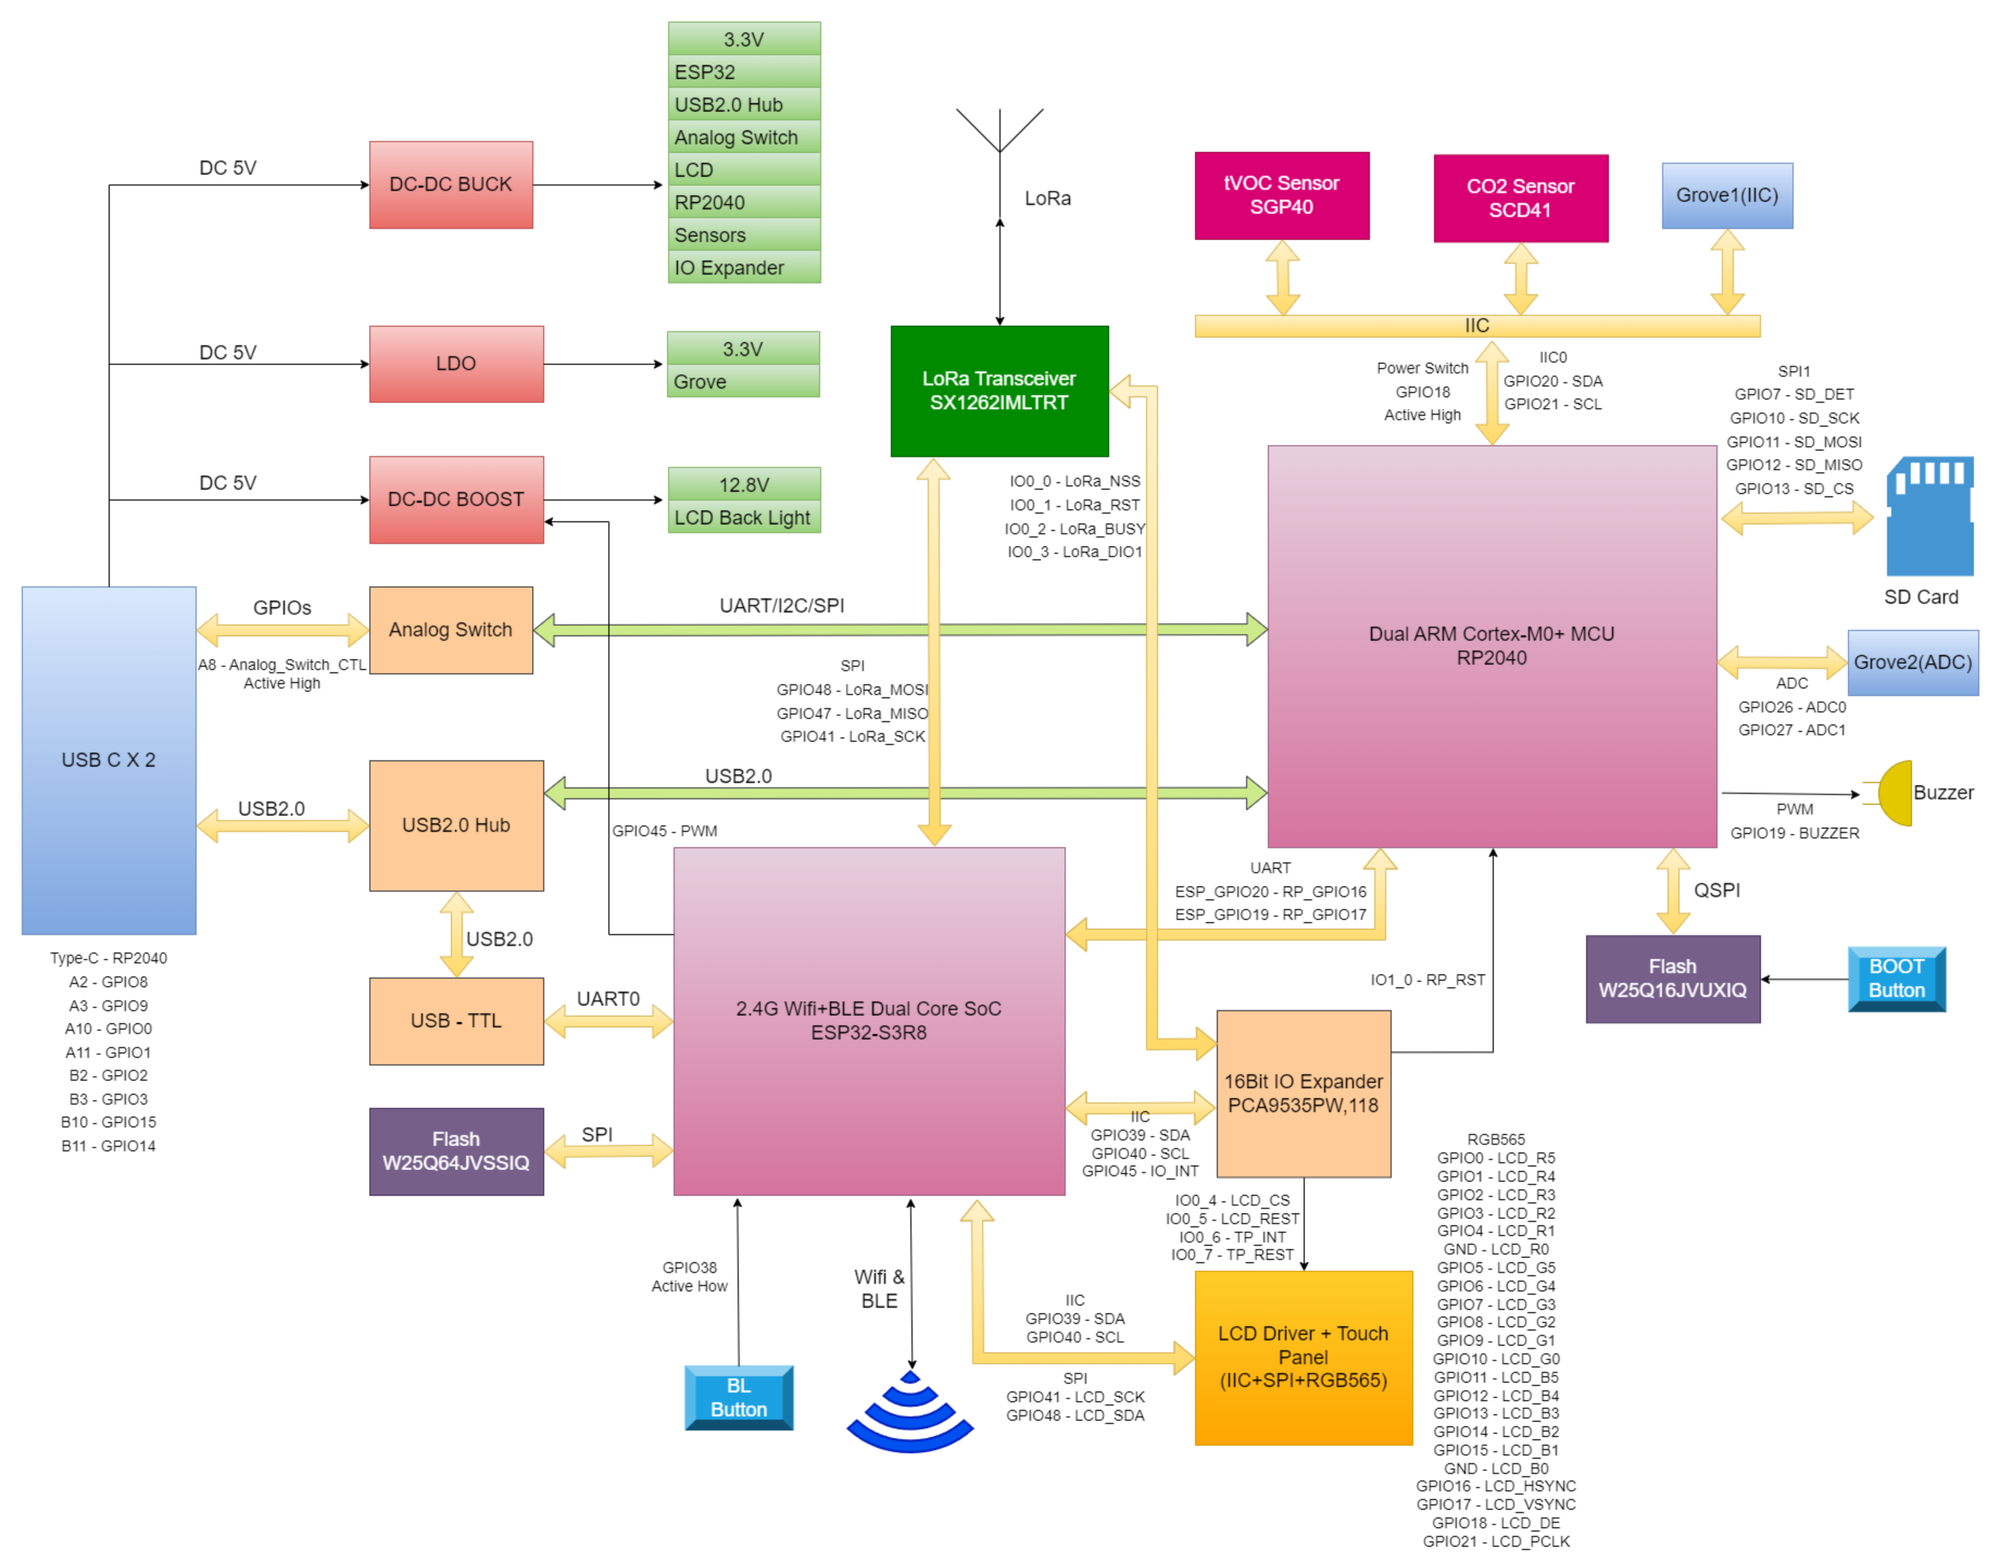
This means you can't just plug in a module and expect it to work—you need a middleware solution to relay data between the RP2040 and ESP32. Seeed addresses this by providing firmware for the RP2040 that forwards information. This works for GPS, but if you want to add other peripherals or if a future update breaks compatibility, you might have to write your own firmware.
Setting Up GPS on the SenseCAP Indicator
1. Flash GPS Firmware to the RP2040
- Press and hold the internal button (you’ll need a needle or pin to reach it).
- While holding the button, connect the device to your PC using a USB Type-C cable.
- Release the button once the device is connected.
- Download the UF2 firmware file for GPS.
- Copy the file to the RPI-RP2 drive that appears on your computer.
- The device will reboot, and the firmware should be applied.
2. Connect the GPS Module


Attach the Grove GPS module to the Grove ADC port (The one nearest to the antenna).
3. Enable GPS in the Meshtastic App
- Open the Meshtastic App (iOS used for this guide).
- Navigate to Settings > Device Configuration.
- Under Position, enable Device GPS.
Ideal Use Cases
After discussing the pros and cons, the big question remains: is the SenseCAP Indicator worth buying? The answer depends on your use case.
- Car node: If you figure out the GPS workaround, the Indicator works well as a car node. The large touchscreen, standalone functionality, and automatic power-on with your vehicle make it a solid choice for Meshtastic users who want a dedicated display for their network.
- Desk or home node: While it’s not a base node (which needs long-range capabilities), the Indicator works well as a home dashboard. If you already have a solar-powered node in the attic, this can be a great indoor interface mounted on a wall by your door—useful for remote-controlling your node and monitoring metrics.
 Adrelien
- DIY handheld Meshtastic tablet: You can power it with a power bank and turn it into a portable Meshtastic display. If someone designs a 3D-printable battery enclosure, something like a MagSafe-style attachment, it could become a fully portable, touchscreen Meshtastic device.
Final Thoughts: A Handy Companion for Meshtastic Enthusiasts
The SenseCAP Indicator really excels in build quality and its beautiful touchscreen, powered by the new MUI being one of the few nodes with touch screen and nice form factor. The interface is smooth, and the hardware feels premium, making it one of the best-designed Meshtastic devices out there. However, the lack of built-in sensors, GPS, or a battery is a major downside, preventing it from being a fully standalone "Meshtastic iPad."
While it does support external modules like GPS, the implementation feels a bit quirky. That said, for its price point, it’s still a solid choice—especially for desktop or vehicle-mounted use, but for true portability, the T-Deck or T1000-E might be better suited.