SenseCAP Solar Node P1 Pro Review: The Best Value Solar Meshtastic Node You Can Buy Right Now
Looking for the best solar Meshtastic node? The SenseCAP P1-Pro delivers a 5W panel, 13,400mAh of battery, and GPS for just $89.90. We ran it for weeks, tracked its power draw on Grafana, tested its range in dense urban streets, and examined every internal detail. See the real-world results.
If you've been around Meshtastic for a while, you already know the T1000-E story. Seeed Studio found the sweet spot, the right hardware at a price nobody else could match, and it became the go-to EDC Meshtastic tracker for the whole community. Then RAK came in with the WisMesh Tag, matched it feature for feature, doubled the battery life, and won at the same price. We covered that in full.

Now Seeed Studio is doing the exact same thing, just in a completely different category. The SenseCAP Solar Node P1-Pro is one of maybe 3–4 ready-to-deploy solar Meshtastic nodes on the market right now that comes with batteries and GPS included. It's $89.90. And it's very hard to argue with.
We've been running it for weeks, tracked its battery behavior over time using Grafana via Harbor Scale, cracked it open, and went through every detail we could. Let's get into it.

What Even Is a Solar Node and Why Does GPS Matter Here?
Before the hardware, this is worth explaining, especially if you're coming from EDC devices like the T1000-E or WisMesh Tag.
A solar node is not a tracker. You don't carry it. You deploy it, on a rooftop, on a pole, on a wall, and leave it there permanently. Its job is to receive packets from other nodes and relay them further, expanding the reach of your whole Meshtastic mesh network.
So why does it have GPS? The answer surprises most people. It's not for location tracking. A fixed, mounted node doesn't need to report "I moved." What GPS gives a permanently deployed node is precise time synchronization. Meshtastic uses GPS time to coordinate slot timing across the mesh, which improves packet delivery, reduces collisions, and makes the whole network more efficient. If you want to go deep on why this matters, we broke it all down here
With that out of the way, let's talk hardware.
P1 vs P1-Pro, Which One Should You Buy?
There are two versions of this device and the difference matters before you even hit the buy button.
SenseCAP Solar Node P1 — $69.90 Same solar panel, same enclosure, same MCU and LoRa module, same mounting kit. What it doesn't come with: batteries and GPS. You supply your own four button-top 18650 cells, and if you want GPS/time sync you add the XIAO L76K module yourself. It's the budget entry point for people who already have batteries lying around, don't need GPS timing, or just want to keep costs down.
If you go the P1 route, installation is straightforward, remove the screws and cover, drop in your four button-top 18650 (3.6V) cells into the holder, slot the GPS module onto the board if you're adding one, then reassemble and make sure the screws are firmly tightened to maintain the enclosure seal. Flat-top 18650s will not make reliable contact, button-top only. The first time you power it on, connect it via USB-C first to activate it; if it doesn't respond to the power button, charge it before trying again. Do not use a fast-charging adapter.
SenseCAP Solar Node P1-Pro — $89.90 Everything above, plus four 3350mAh 18650 batteries already installed, and the XIAO L76K GPS module pre-fitted. You open the box, mount it, and you're live. The $20 premium over the P1 is genuinely good value when you consider you're getting four quality cells and a GPS module included, both already sourced, already installed, already tested at the factory.
Our review unit is the P1-Pro. If you just want a node up and running without sourcing parts, this is the one.
Unboxing and First Impressions
Everything you need to actually deploy this is in the box. Not just the node, the full mounting kit, the cable, the antenna, everything.
- SenseCAP Solar Node P1-Pro unit
- Full mounting kit: Universal Joint, Connector, Hoop Bracket, Hoop Ring
- 2dBi 868–915MHz rubber rod antenna
- RF Cable: RP-SMA Male to SMA Female, 300mm, thick, durable, not the flimsy type
- Black USB-C cable
- User manual
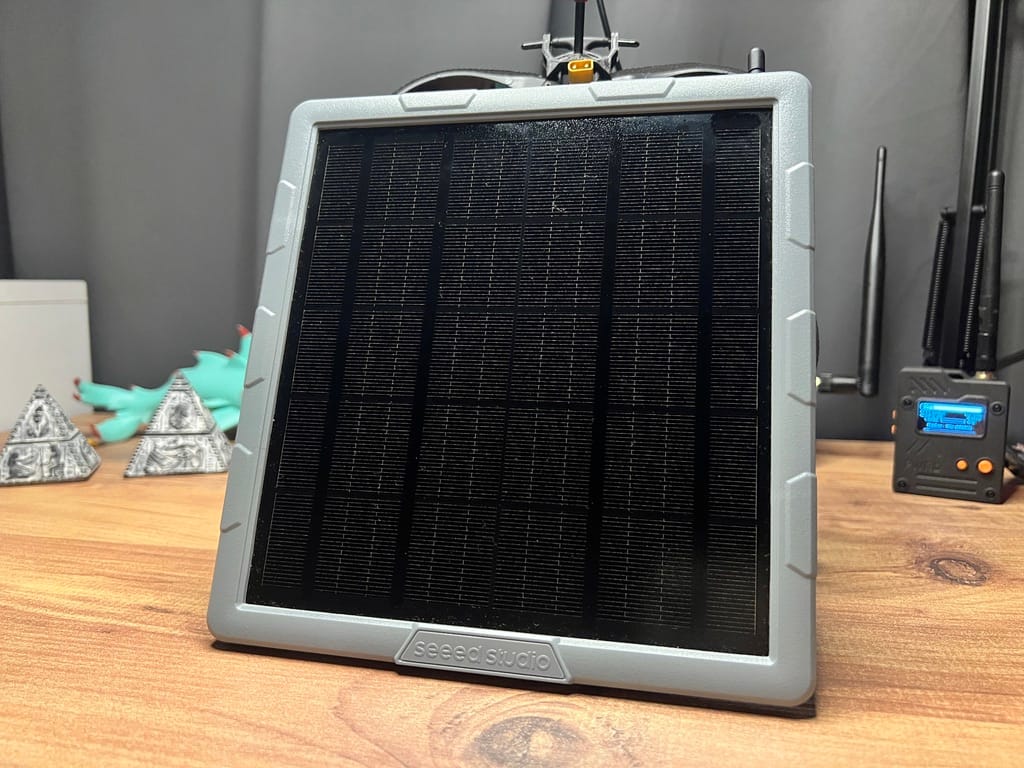
The unit is the biggest thing we've reviewed on this site at 191.2 × 201.2 × 42.1mm. That's because it's a solar panel first and a node second. Pick it up and it feels solid, not heavy-duty industrial like the $300 RAK WisMesh Repeater, but genuinely rigid plastic that doesn't flex or feel cheap. For the price, the build quality is impressive.
The solar panel covers the entire face. Electronics are in a sealed compartment on the back. LEDs and buttons on the bottom, USB-C port for backup charging or flashing, SMA connector for the antenna. Everything self-contained, no external cables, no dangling wires, nothing to manage. When you're mounting this 3 meters up on a pole in the rain, that matters more than it sounds.
The two mounting bolts on the back of the unit will make you raise an eyebrow the first time you look at them, two bolts holding a device to a pole in wind? But after seeing how the bracket system distributes load, it makes sense. More on that below.
What's Actually Inside
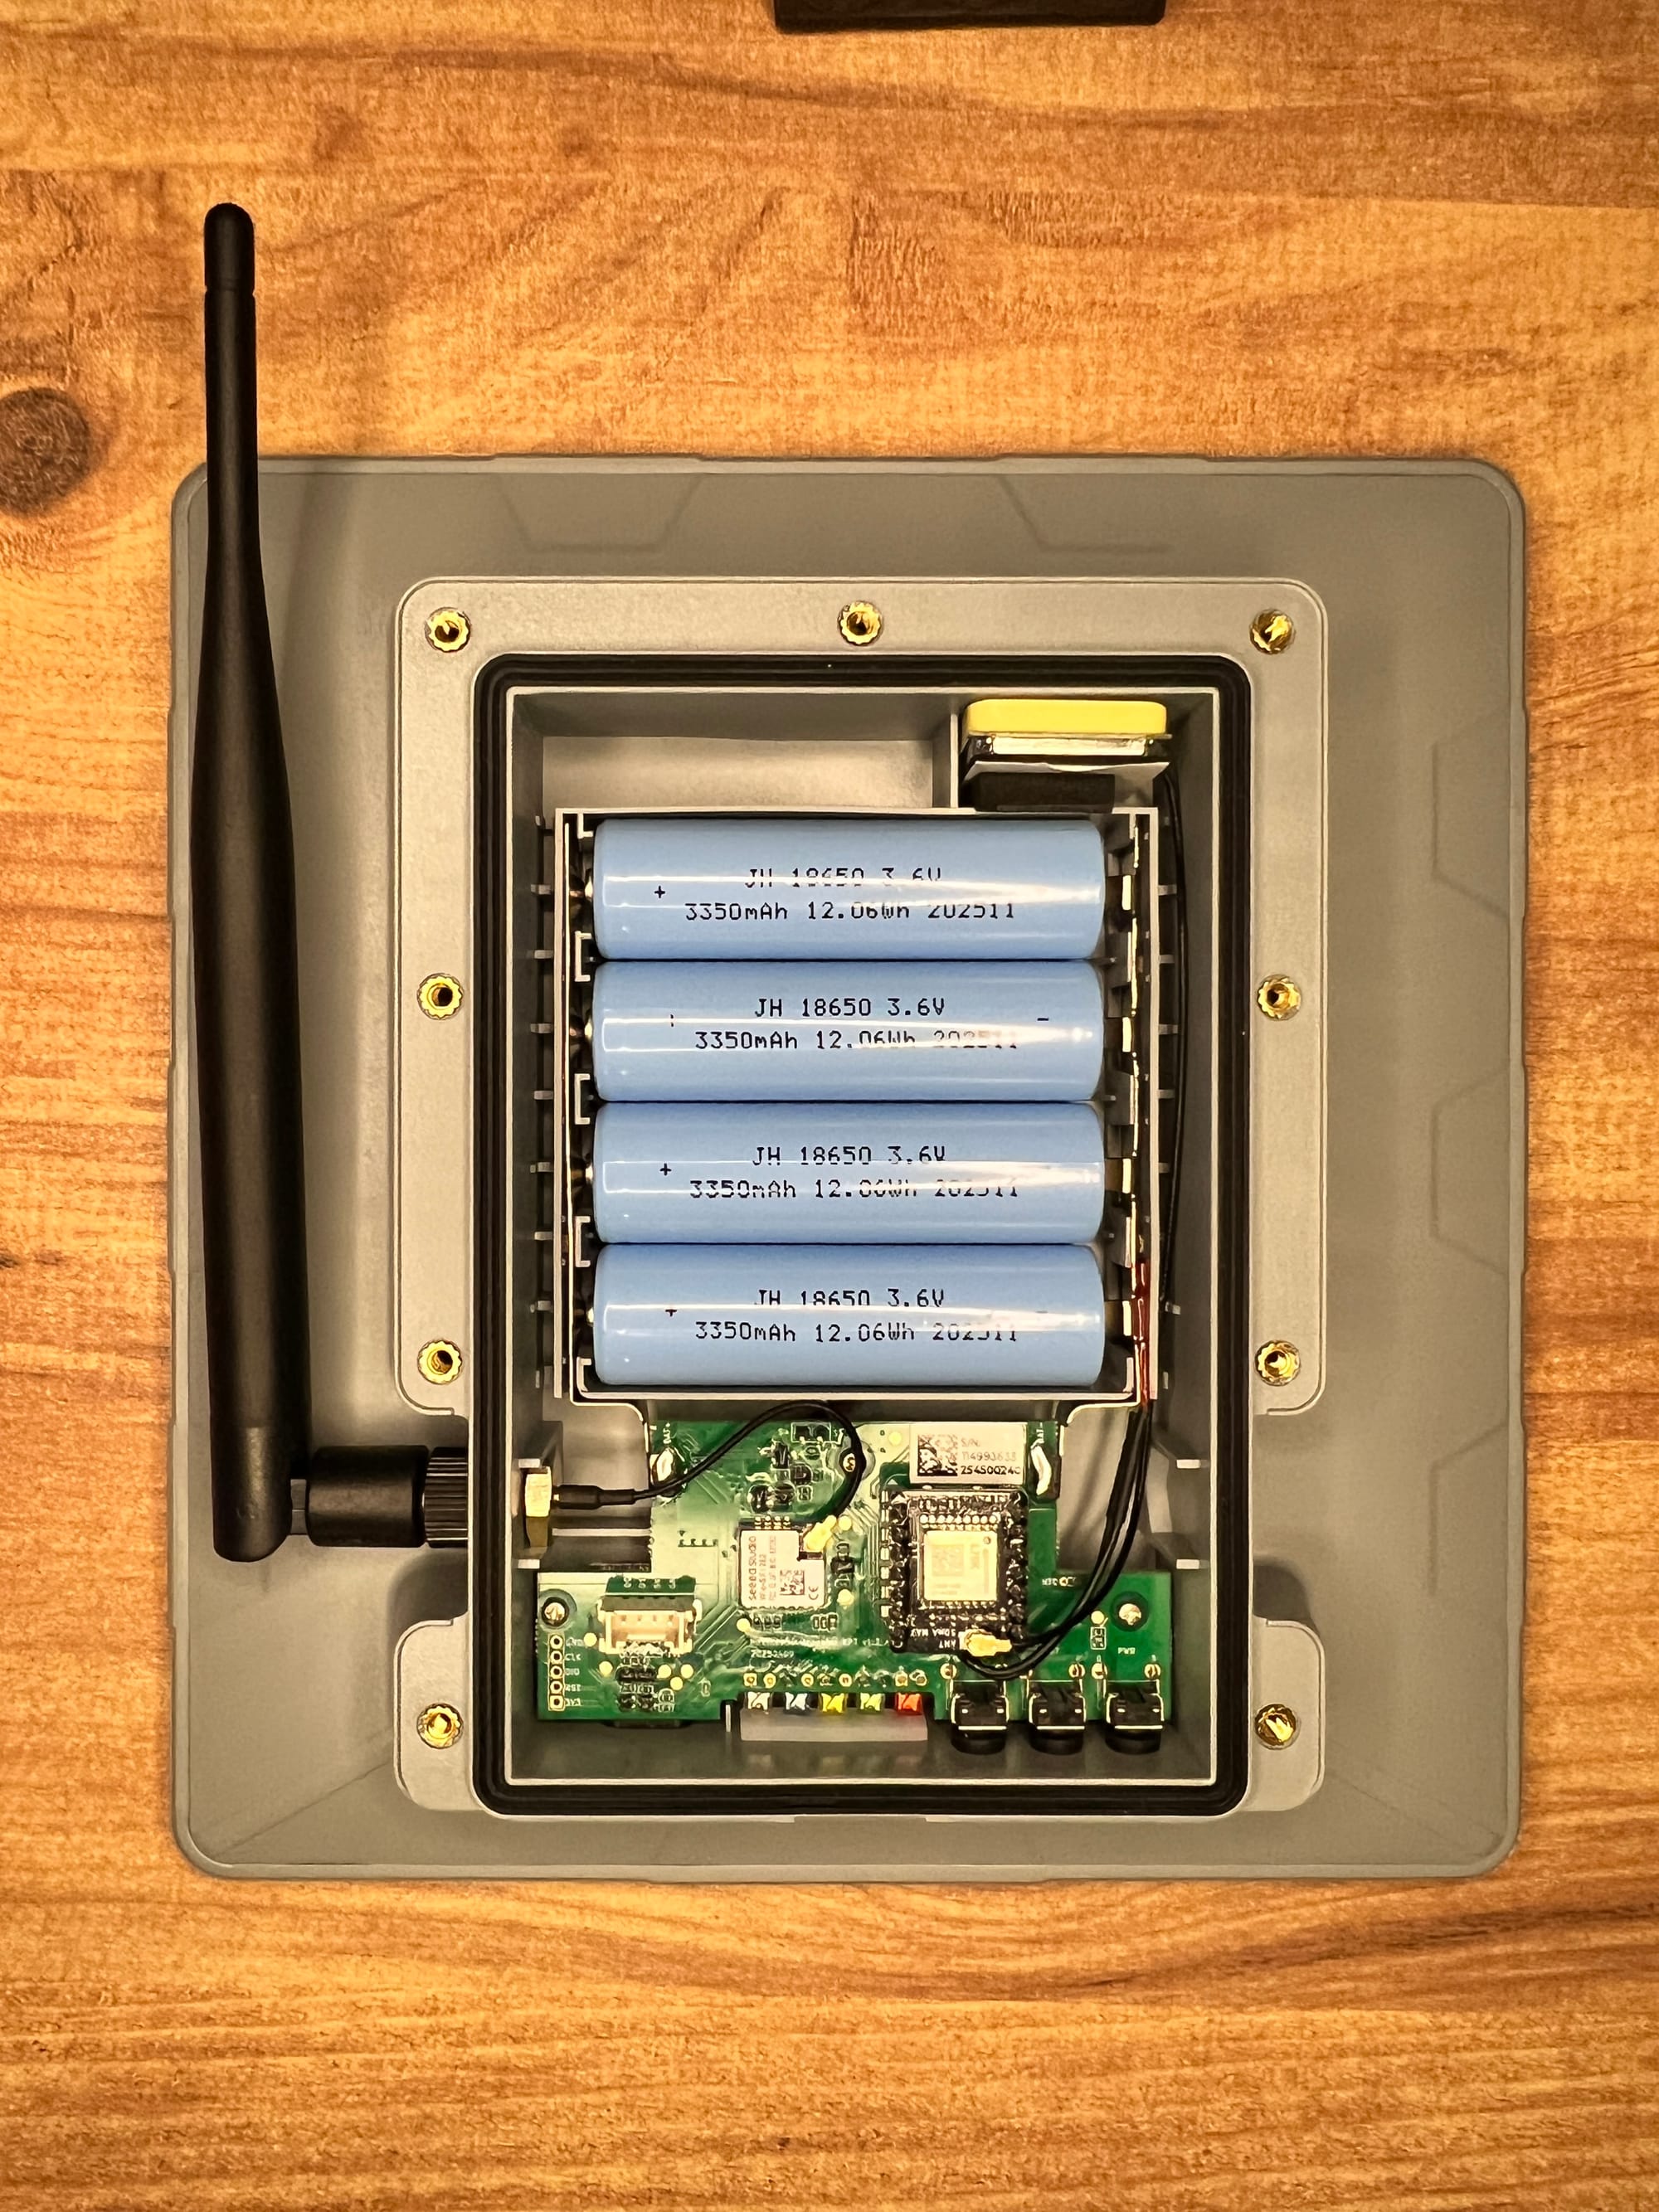
Pop the back panel and you get a clean, well-organized PCB. Here's what's on it:
MCU: XIAO nRF52840 Plus Nordic nRF52840, 32-bit ARM Cortex-M4 at 64MHz, 256KB RAM, 1MB Flash + 2MB onboard Flash. One of the most power-efficient MCUs in the Meshtastic ecosystem — the same chip family as the WisMesh Tag we reviewed. For a solar device that needs to survive cloudy stretches on battery alone, low power consumption is not optional.
LoRa: Wio-SX1262 Semtech SX1262, 22dBm TX power, 862–930MHz. FCC ID visible right on the module: 2AT4T-WIO-SX1262. One of the best LoRa chips available, great sensitivity, solid performance.
GPS: Quectel L76K Visible on the PCB with "ANT 50m MAX" labeled next to its u.FL connector for the internal GPS antenna. Supports GPS, GLONASS, and Galileo. Single-band L1. For time sync on a fixed node, this is completely adequate.
Batteries: 4× JH 18650, 3350mAh each Manufactured November 2025, these are fresh cells. Total raw capacity: 13,400mAh / ~49.6Wh across four cells. That is a serious battery reserve by any Meshtastic standard. Replacement is straightforward, use button-top 18650s.
Grove connector One Grove interface (IIC/GPIO/UART) on the board for sensor expansion. More on what this enables in its own section.
Solar input: 5W panel, 5V 1A Maximum charging current is 1A, managed by the CN3165 charging IC on board.
The internal assembly is clean and tight. Cable management is properly done. This was designed by people who thought about assembly, not just specs.
Hardware Specs at a Glance
| SenseCAP Solar Node P1-Pro | |
|---|---|
| Price | $89.90 |
| MCU | XIAO nRF52840 Plus (nRF52840) |
| LoRa | Semtech SX1262, 22dBm, 862–930MHz |
| GPS | Quectel L76K (GPS / GLONASS / Galileo) |
| Battery | 4× 18650, 3350mAh each (~13,400mAh total) |
| Solar Panel | 5W, 5V 1A |
| Antenna (stock) | 2dBi rubber rod, 868–915MHz |
| Charging | Solar + USB-C 5V 1A |
| Grove interface | 1× (IIC/GPIO/UART) |
| Dimensions | 191.2 × 201.2 × 42.1mm |
| Certification | FCC, CE |
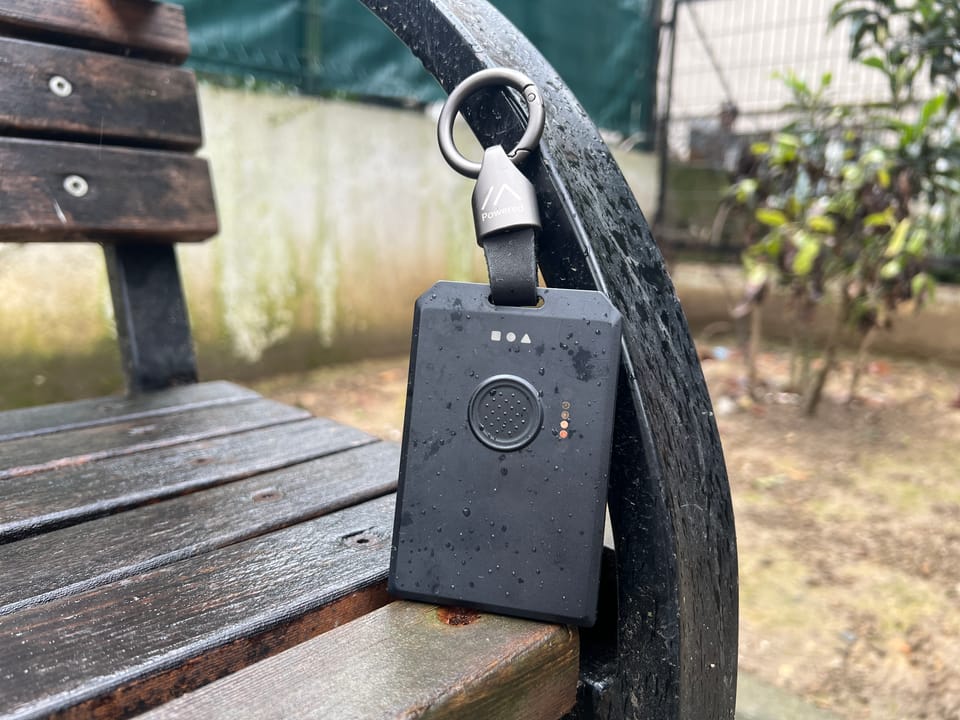
LEDs and Buttons
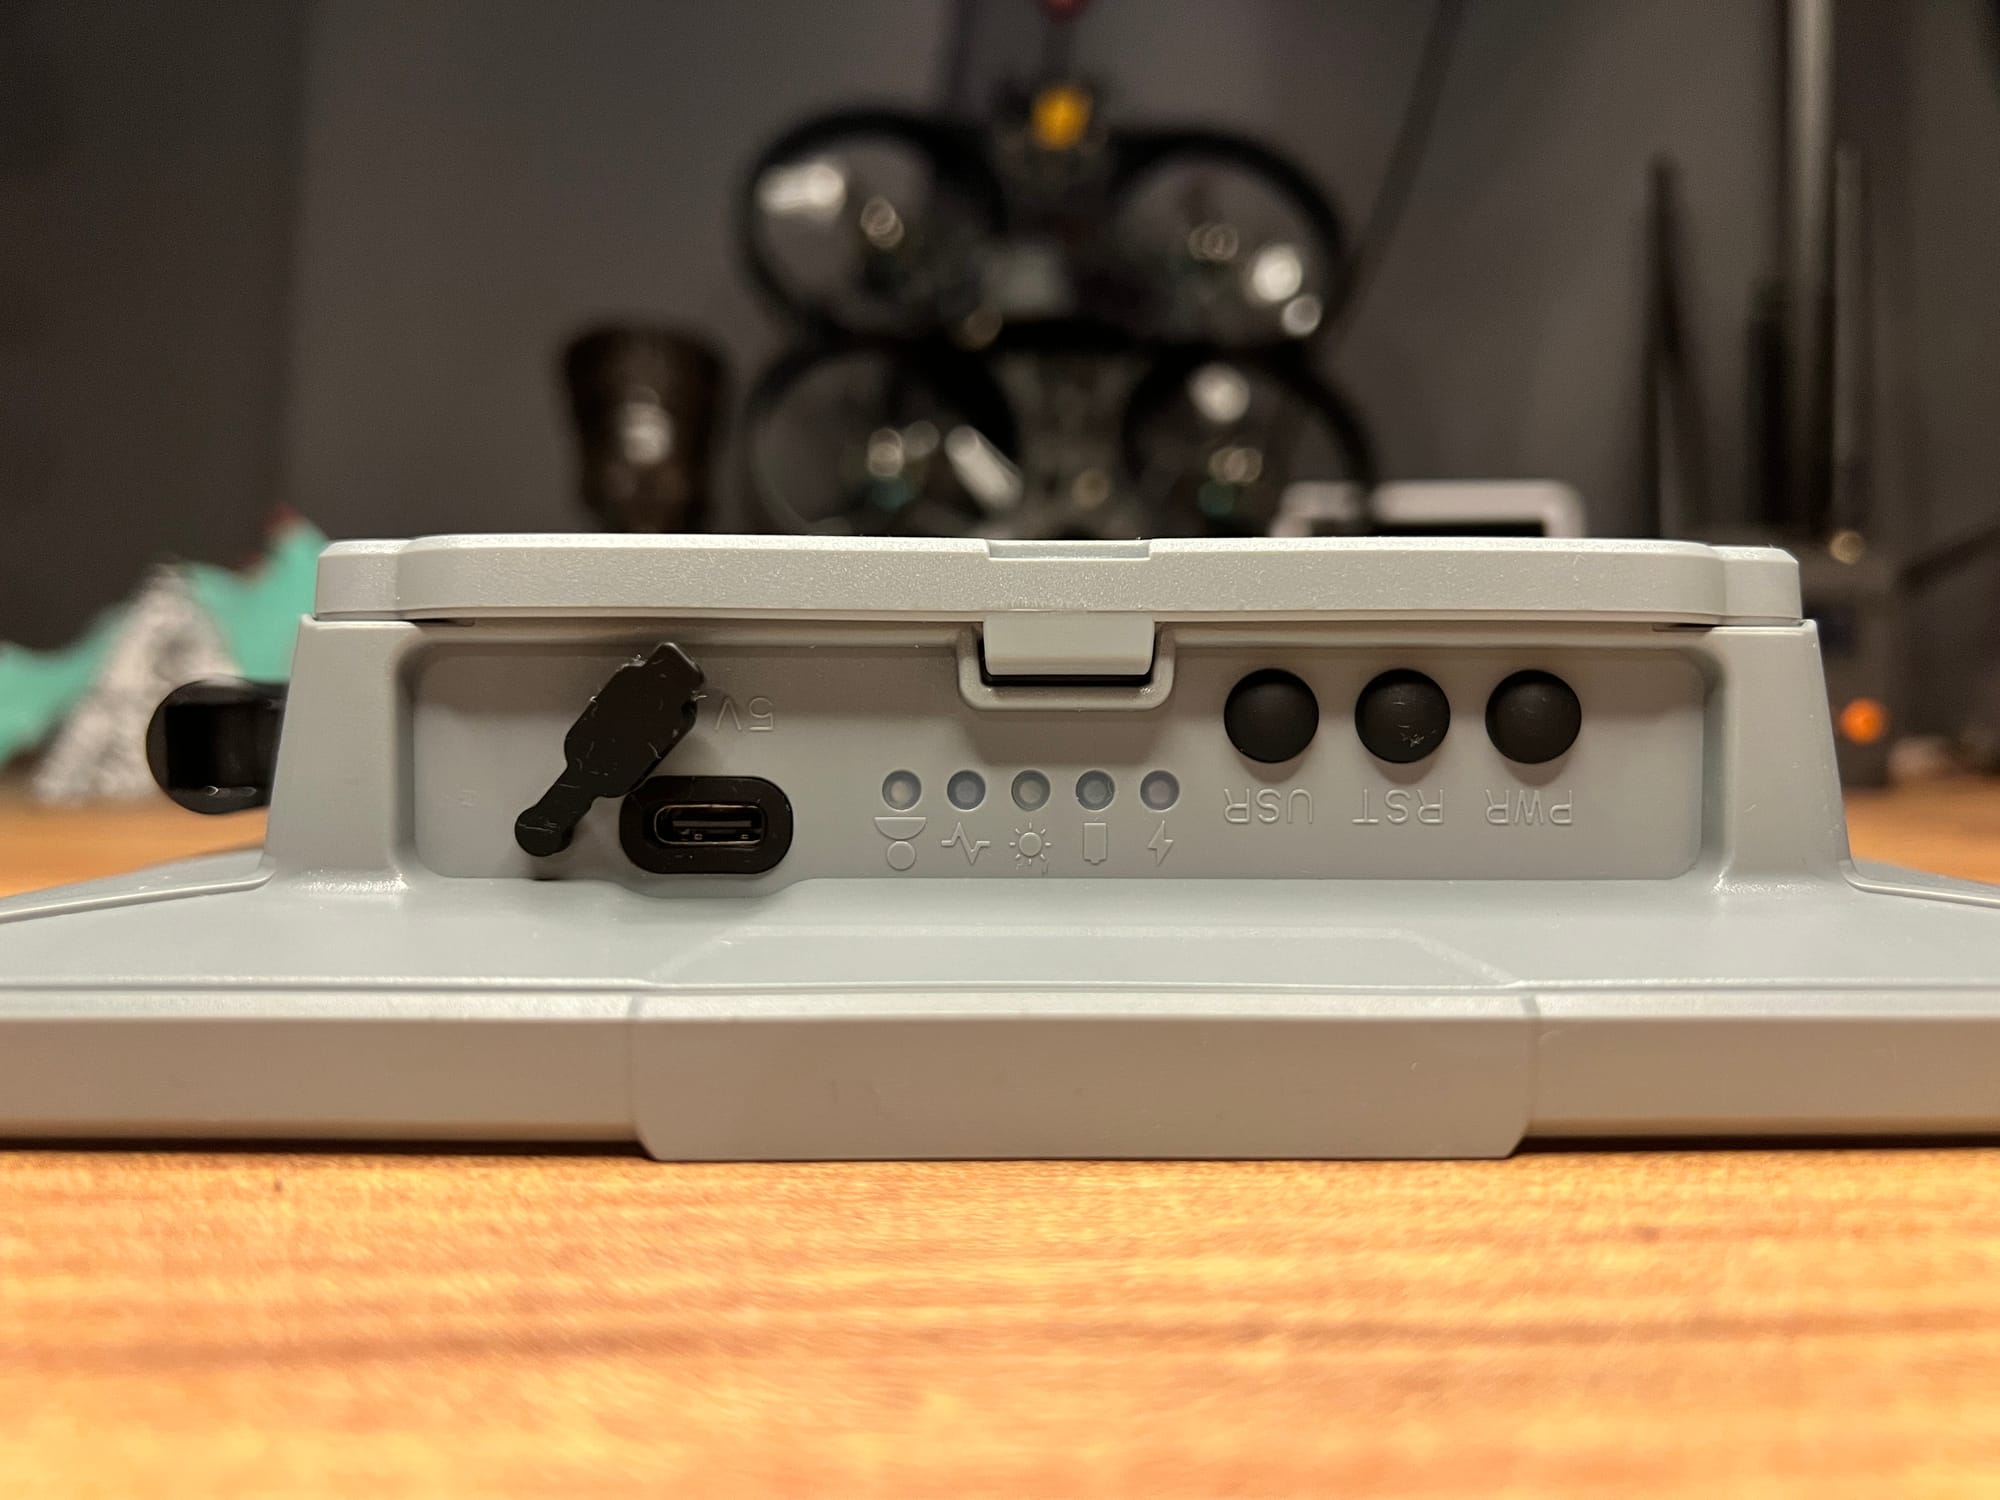
Five dedicated LEDs, each with exactly one job:
- 🔴 Red: Charging (USB-C or solar active)
- 🟢 Green: Fully charged
- 🟡 Yellow: Solar panel is receiving light
- 🔵 Blue: Mesh heartbeat
- ⚪ White: User-defined
No blink-pattern decoding. No guessing whether you're looking at a heartbeat or a charging state. Each light means one thing. The yellow solar indicator is especially practical, at a glance, without pulling your phone out, you know whether the panel is seeing useful light. That's a small design decision that pays off every single day the node is deployed.
The button controls are clean and logical:
| Button Action | Function |
|---|---|
| Press PWR for 3s | Power on |
| Press PWR twice | Update node / location info |
| Press PWR three times | Switch GPS on/off |
| Press PWR for 5s | Power off |
| Press RST twice | Manually enter DFU mode |
The white LED (⚪ user-defined, P0.15 / GPIO 15) and the user button (P1.07 / GPIO 39) are both accessible through Meshtastic's device configuration if you want to repurpose them. To configure the user button, go into the Meshtastic app → Settings → Device Configuration → Device → GPIO → Button GPIO, and enter 39. The LED can similarly be referenced by its GPIO number in custom configurations. This is a niche use case, most people will never touch it, but if you're building out a custom role or experimenting with canned messages triggered by a hardware button, the pins are there and Meshtastic supports it.
No app needed for the basics. GPS toggle on the fly, position broadcast on demand, DFU from the button, all without touching your phone. The RST double-press for DFU is a much better experience than most devices that require a specific cable-disconnect sequence.
There's a specific warning in Seeed's documentation worth repeating: do not use NRF-OTA to update firmware on this device, it can brick it. Use the Web Flasher or manual UF2 drag-and-drop only. Always flash the erase firmware first before flashing a new version.
don't use NRF-OTA to update the firmware, it may cause the device to be completely dead. Before flashing the firmware, please flash the erased firmware first!Setup and Pairing
Ships pre-flashed with Meshtastic firmware. Power on, open the Meshtastic app, go to Bluetooth, it shows up immediately. Pair, set your region, done. Default PIN is 123456.
For deployment as a router/repeater, go into device settings and set the role to Router or Repeater. Router mode is the recommended starting point for most fixed node deployments.

Firmware Flashing
The nRF52840 is one of the friendliest chips to flash in the entire ecosystem. No drivers, no Python scripts, no esptool. It appears as a USB mass storage drive and you copy a file.
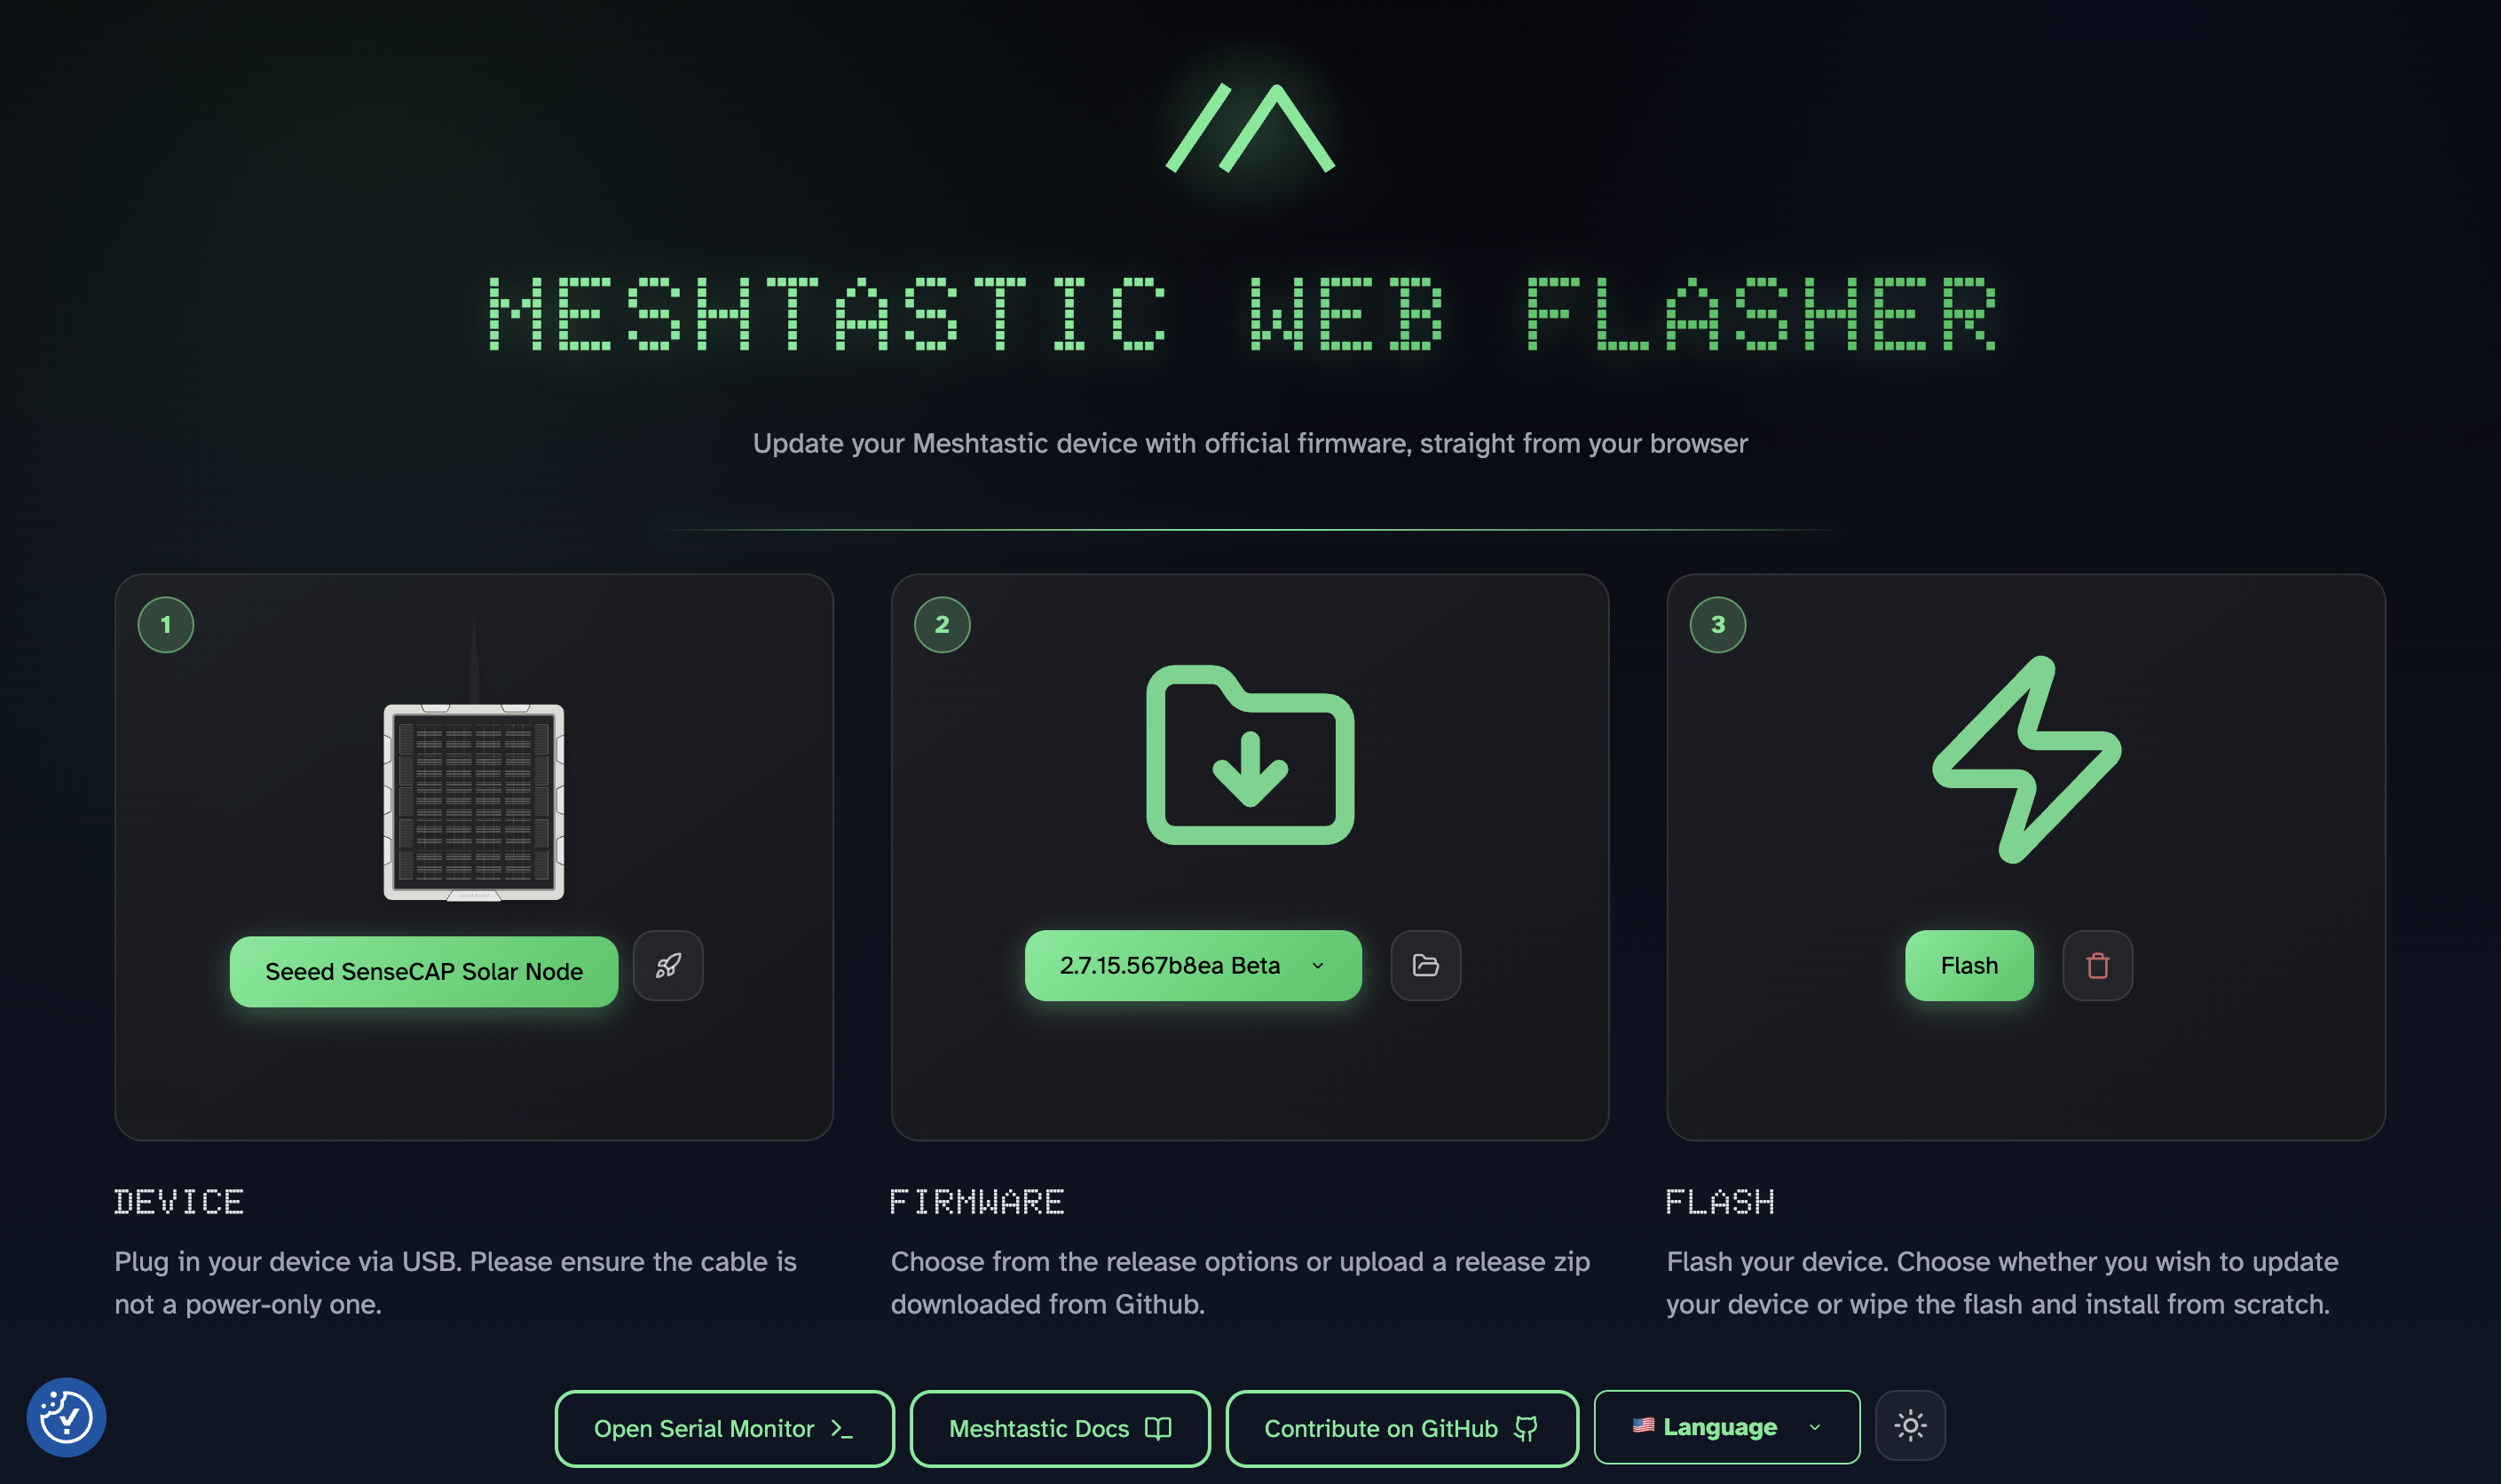
Via Web Flasher (recommended):
- Go to flasher.meshtastic.org in Chrome or Edge
- Select Seeed SenseCAP Solar Node from the device list
- Click the trash icon to flash the erase firmware first, this step is mandatory on this device
- Click Enter DFU Mode, the device will appear as a USB drive named
XIAO-xxx - Copy the erase UF2 file to the drive and wait for it to disappear
- Then select your chosen firmware version and click Flash
- Enter DFU mode again, download the firmware UF2, and drag it to the drive
If the drive disconnects mid-copy, don't panic. That's normal nRF52 behavior. The transfer completed and the device is rebooting.
Mounting System

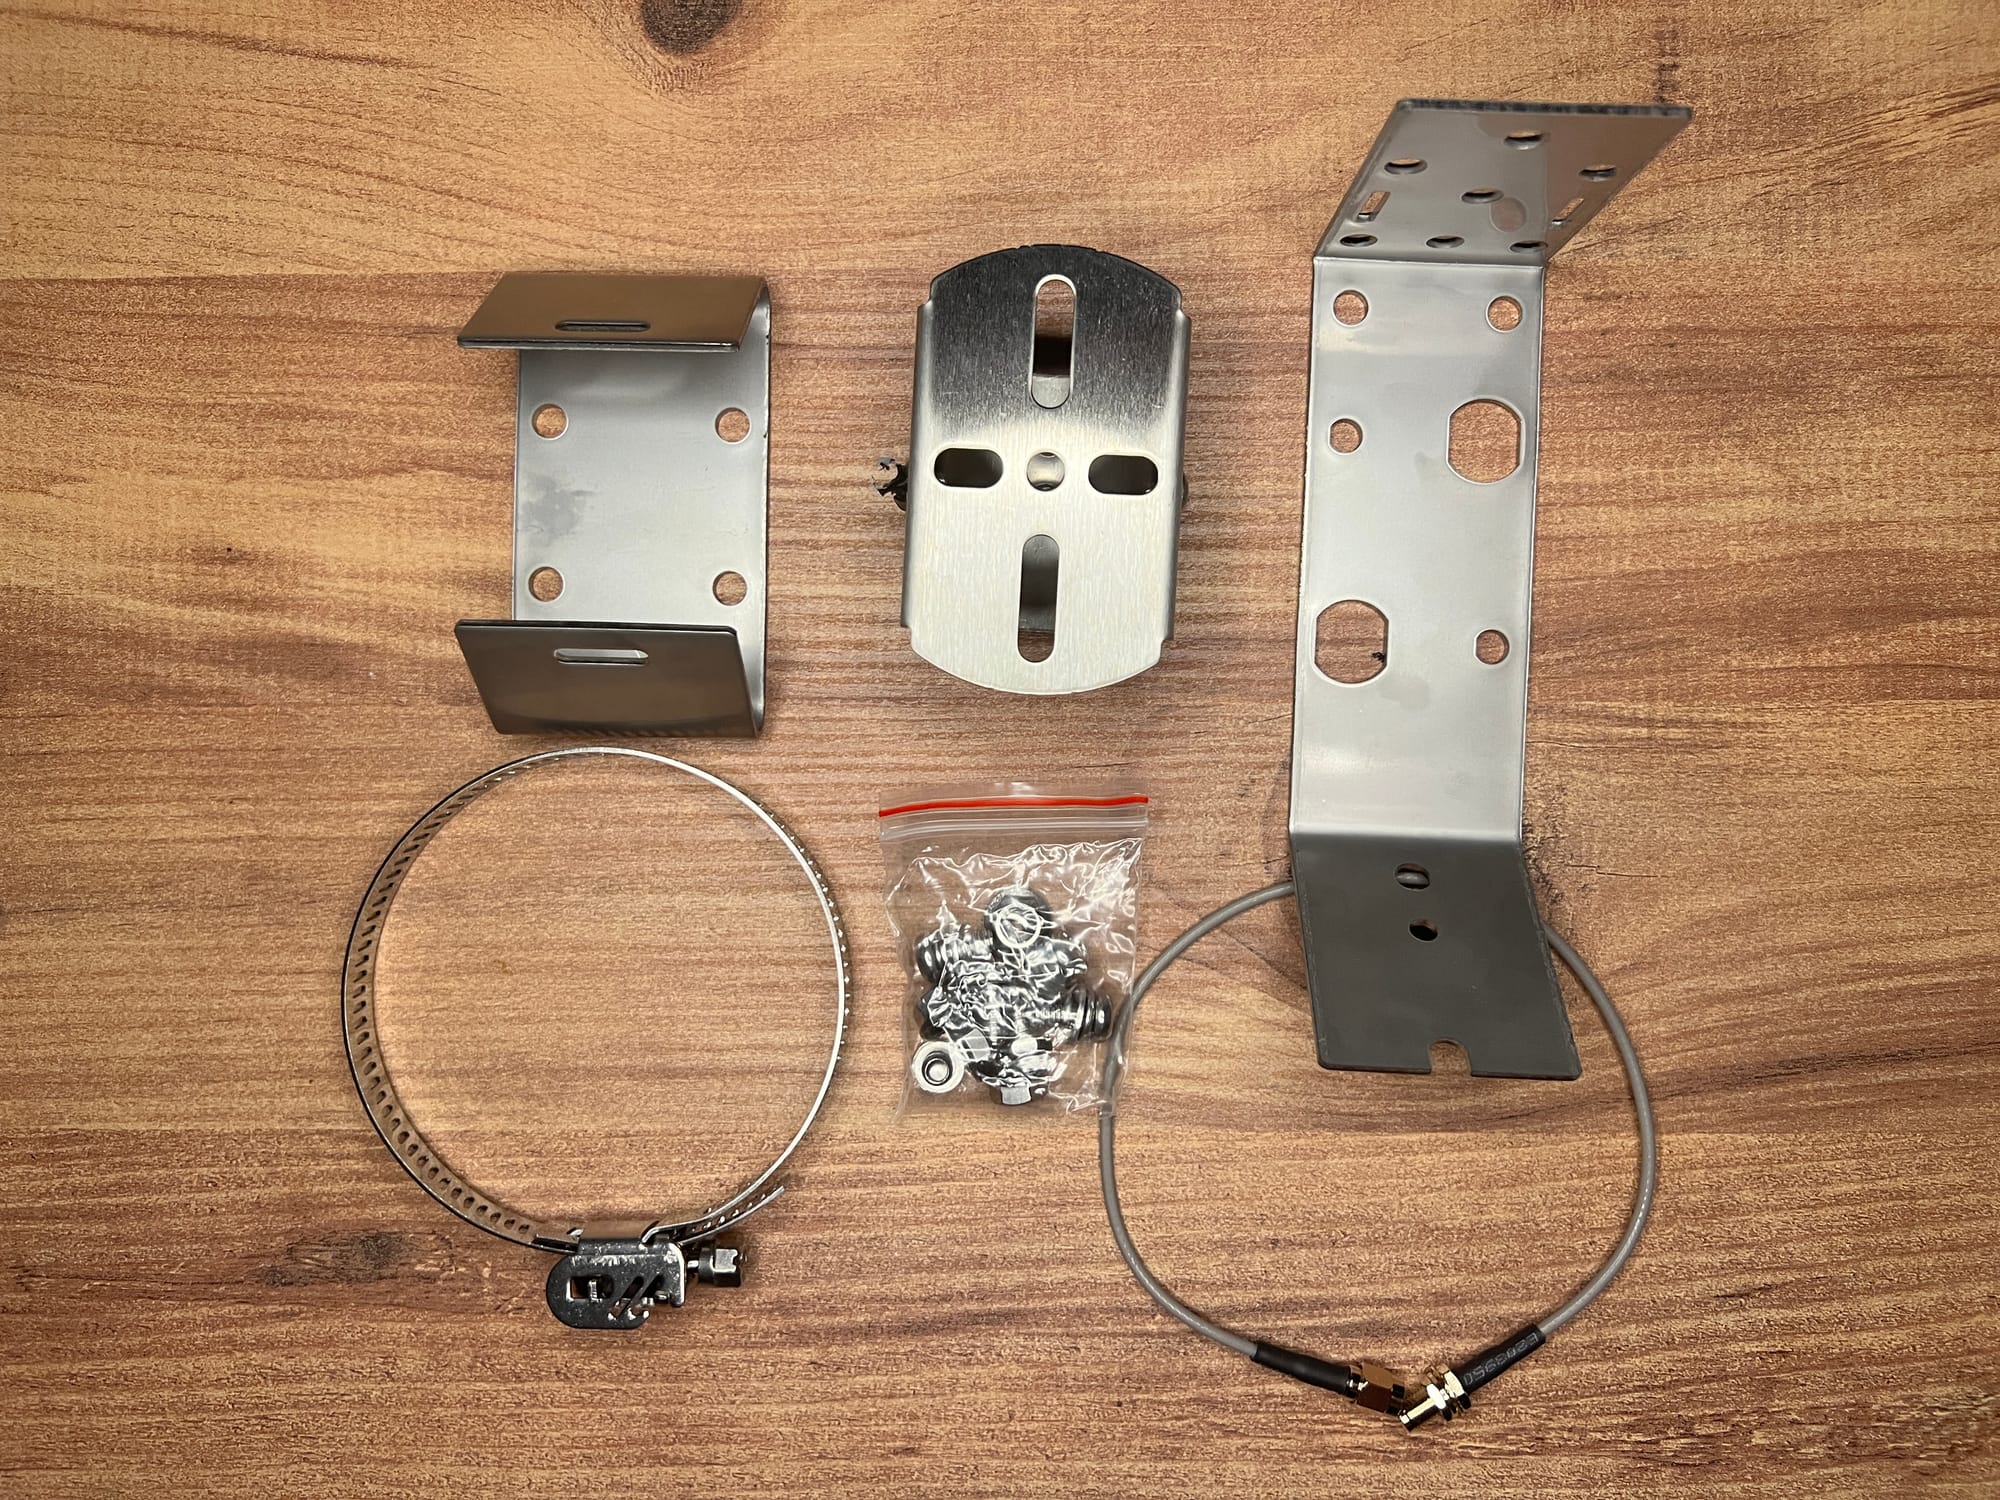
The mounting kit deserves a proper section because it's one of the best bundled mounting systems we've seen on a Meshtastic device at any price point.
Universal Joint — screws into the two mounting holes on the back of the unit. Swivels up and down for tilt adjustment after the bracket is already fixed to the pole. This matters more than it sounds: you mount the bracket once, then fine-tune your solar panel angle separately. No repositioning the whole assembly.
Bracket Connector — links the Universal Joint to either a wall or the pole hoop system.
Hoop Bracket + Hoop Ring — this is the part that surprised us. Most pole mounting systems at this price range give you a worm-drive hose clamp, you rotate a screw to wind a steel band tighter around a pole, fighting with it the whole way, especially one-handed on a ladder.
This is not that. The hoop ring opens like a bracelet clasp. Open it, wrap it around the pole by hand, click the clasp shut to lock it in place, then tighten with the screw. Open → wrap → click → tighten. Done. No feeding a band through a channel, no winding anything, no fighting. It works on poles between 70–100mm diameter which covers most masts, gutters, and mounting poles you'd realistically use.
The included RF cable runs through a pre-drilled hole in the bracket connector, letting you position the antenna separately from the panel, useful if you want to run a longer aftermarket cable to get the antenna higher or in a better RF position.
One honest note: those two mounting bolts connecting the unit to the Universal Joint will raise your eyebrow the first time. In practice the load distribution works and the hardware is solid, but if you're in a high-wind environment, make sure they're properly torqued before walking away.
Battery Life
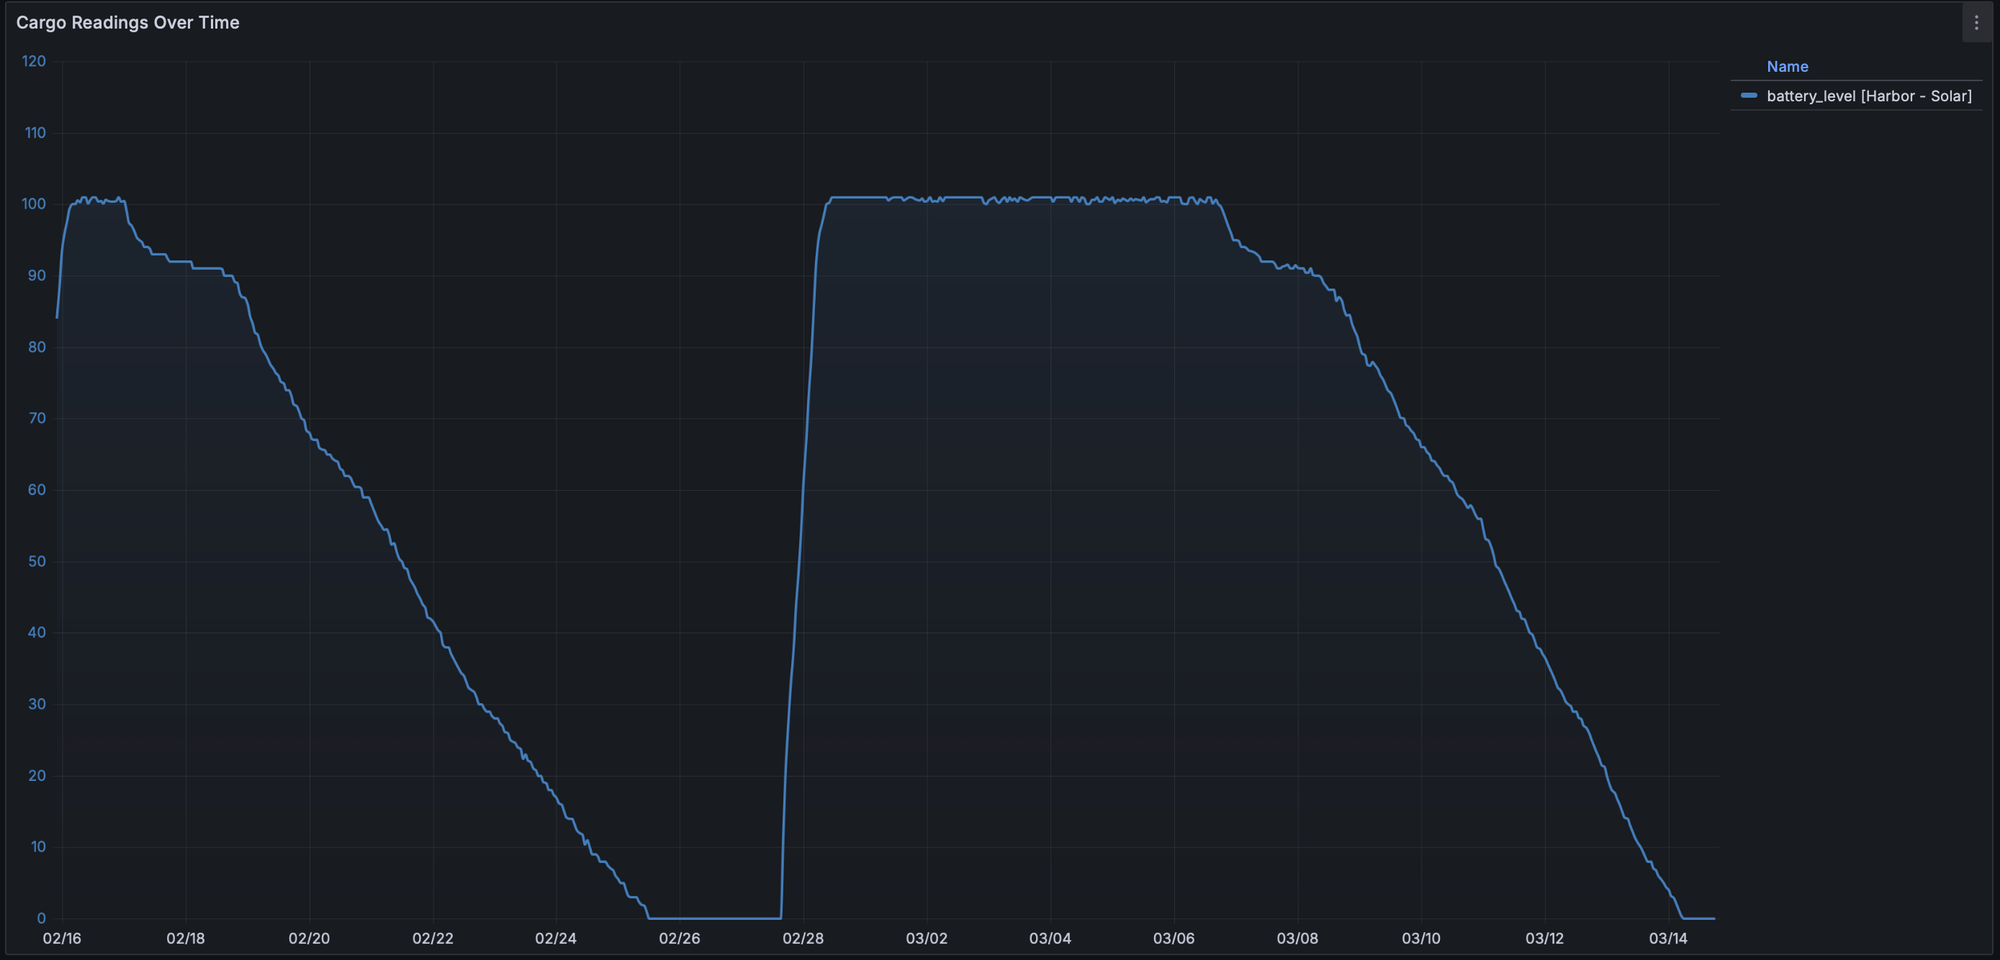
We tracked battery behavior over a 27-day period (February 16 – March 14) using Grafana via Harbor Scale. Here's exactly what happened, with no spin:
First cycle (Feb 16 – ~Feb 25): Unit running continuously, face-down on a desk with zero light exposure. Worst case scenario. Drained from 100% to dead in approximately 9 days with no solar input whatsoever.
Second cycle (Feb 28 – Mar 14): Recharged to 100% via USB-C, then placed near a window with minimal indirect light. Drained at a similar rate to the first cycle, the limited window light did not produce a meaningful difference in drain speed.
What this actually tells you: With zero solar input, none, worst case, buried indoors, you have roughly 9 days of runtime from battery alone. Outdoors with any real sun exposure, that number changes dramatically. One real-world user running their P1-Pro 43 feet up a tree with a 5.8dBi antenna swap reports their battery has never dropped below 87%. That's what actual outdoor solar deployment looks like.
Solar Charging
We weren't able to do controlled outdoor solar testing, so let's use Seeed's own consumption data and do the math properly.
Panel output: 5W peak, 5V 1A
Max charging current: 1A (limited by the XIAO nRF52840 Plus at 200mA; charging IC CN3165 handles up to 1A)
Total battery capacity: 4 × 3350mAh = 13,400mAh (~49.6Wh at 3.7V nominal)
Node consumption (nRF52840, router mode with GPS): approximately 30–80mW average depending on traffic and GPS update rate
At 5W peak input with ~75% charge efficiency, you're adding roughly 3.75Wh back per peak sun hour.
Summer (4 peak sun hours/day): ~15Wh generated vs ~0.7–2Wh consumed. Strongly net positive. Battery stays topped up.
Winter (1.5 peak sun hours/day): ~5.6Wh generated. Still likely net positive for most of Europe and North America even in winter.
Zero sun, worst case: ~9+ days of runtime from battery reserve alone, as confirmed by our telemetry.
Placement advice: Northern hemisphere, face the panel south. Southern hemisphere, face it north. Tilt angle should roughly match your latitude for best year-round harvest. The Universal Joint lets you adjust this after mounting without touching the bracket. A vertically mounted panel (on a wall) loses significant efficiency compared to a tilted south-facing mount, worth considering when choosing your deployment spot.
USB-C Charging, Why This Matters More Than You Think
Most ready-to-deploy solar nodes use proprietary connectors or SP11 waterproof connectors. This one uses USB-C. That sounds like a small detail until you think through the actual scenarios:
It's been overcast for a week. The battery is getting low. Your node is already mounted. You want to top it up without pulling it down. With a proprietary connector, you need the specific cable, lose it and you're stuck. With USB-C, you grab any power bank, any laptop charger, any cable already in your bag.
Or you need to flash a firmware update. With most mounted solar nodes you pull it down, unscrew the back, find a cable, flash, reassemble, remount. With this one you bring a laptop and a USB-C cable up the ladder and you're done on the spot. You don't even have to open it.
Compared to the magnetic puck chargers on the T1000-E and WisMesh Tag where losing the puck is a real problem, USB-C on a permanently deployed solar node is a genuine win. The SP11 connectors on competing devices like the ThinkNode M6 are better for weather sealing, no argument there, but the flexibility USB-C gives you for maintenance and field updates is hard to replace.
IP Rating and Weather Resistance
Seeed rates the P1-Pro at IPX5, certified to handle sustained water jets from any direction. For a permanently mounted outdoor node, that's the baseline you want, and it's more than most devices in this category will put in writing.
The X in IPX5 is worth understanding. We asked Seeed Studio directly, and they confirmed the device is not dust rated specifically because of the USB-C port, that single opening is what prevents a full IP65 or higher certification. Some competing nodes like the ThinkNode M6 do carry IP65, and if dust ingress is a genuine concern for your deployment environment, that's worth factoring into your decision.
That said, we'd push back on framing the USB-C port as a downside. The flexibility it gives you for field charging and firmware updates is genuinely valuable on a permanently mounted node, and it's worth a lot more to us than a cleaner IP number on a spec sheet. The unit ships with a rubber cover for the port, and it sits at the bottom of the enclosure, so rain isn't running directly into it anyway. Cap it when it's not in use and you've addressed the exposure point entirely.
For the vast majority of outdoor deployments, IPX5 plus the rubber cover is more than adequate. Just go in knowing what the rating covers and what it doesn't.
Sensor Expansion, The Grove Interface
The P1-Pro has a Grove IIC/GPIO/UART interface on the internal board. Open the unit, plug in a compatible sensor, close it back up. It's plug-and-play inside.
Seeed has verified compatibility with these sensors:
| Sensor Type | Compatible Models |
|---|---|
| Pressure | BMP085 |
| Temperature | MCP9808, PCT2075 |
| Temperature & Humidity | SHT31, SHTC3, SHT4X, AHT10 |
| Temp + Humidity + Pressure | BME280 |
| Heart Rate & SpO₂ | MAX30102 |
| I2C Keyboard | CardKB |
The BME280 is the most relevant for most deployments, temperature, humidity, and barometric pressure in one sensor, and Meshtastic already has telemetry support for environmental data. With a BME280 plugged in, this solar node can double as a weather station broadcasting atmospheric data over the mesh. Something no other device in this price range can do out of the box.
One thing to note: the sensor sits inside the sealed enclosure when installed, so temperature readings reflect internal ambient temperature, not true outdoor air temp. That gap matters depending on how much direct sun hits the enclosure and how long it's been running. Worth keeping in mind when interpreting environmental telemetry.
Always check current Meshtastic firmware notes for which sensors are actively supported before purchasing one for this use case, firmware support continues to evolve.
This is also something Seeed could expand on in a future iteration. The Elecrow ThinkNode M6 has dual external waterproof SP11 sensor connectors, which means you can run sensors outside the enclosure without opening anything. For a weather station use case that's a meaningful advantage. Something to consider for P1-Pro v2.
The Competition
The P1-Pro at $89.90 is one of very few ready-to-go solar Meshtastic nodes with GPS and batteries included. Here's the full picture:
Elecrow ThinkNode M6 — ~$80 6W panel (bigger than the P1-Pro's 5W), 7000mAh across 2 Panasonic cells, IP65, dual external SP11 waterproof sensor connectors (advantage for external sensing), separate GPS and LoRa antennas. On paper it's a genuine competitor, larger panel, external sensor ports, similar price. We haven't received our review unit yet so we won't give a full verdict, but watch this space. Battery capacity is 7000mAh vs 13,400mAh, the P1-Pro wins that comparison significantly even though the M6 uses quality Panasonic cells. Also the M6 comes only with plastic wall mount so for pole mounting that is something you will have to DIY on your own.
RAK WisMesh Repeater Mini — $99 IP67, 3200mAh battery, integrated solar panel. Costs more than the P1-Pro and delivers 3200mAh vs 13,400mAh. That is not a competitive comparison on battery. You're paying for the IP67 rating and the RAK brand, both of which have questionable value, for most community mesh deployments the P1-Pro's reserve capacity is worth more in practice than an IP rating step up, especially at a lower price.
RAK WisMesh Repeater — $299 A completely different class of device. External 5.2Ah/56Wh solar battery pack, proper weatherized connectors, heavy-duty industrial build, IP67. We have a review unit and the full dedicated review is coming, subscribe if you don't want to miss it. If you need enterprise-grade reliability for a mission-critical or professional installation, this is the device. For everyone else building out a community mesh, it's significant overkill at more than three times the price.
The value verdict: Seeed Studio found the sweet spot again. The same move they made with the T1000-E, enough hardware to do the job properly, nothing wasted, a price that makes every competitor's argument harder to make. At $89.90 with four fresh 18650s, GPS, mounting kit, and USB-C charging, the P1-Pro wins the value argument clearly.
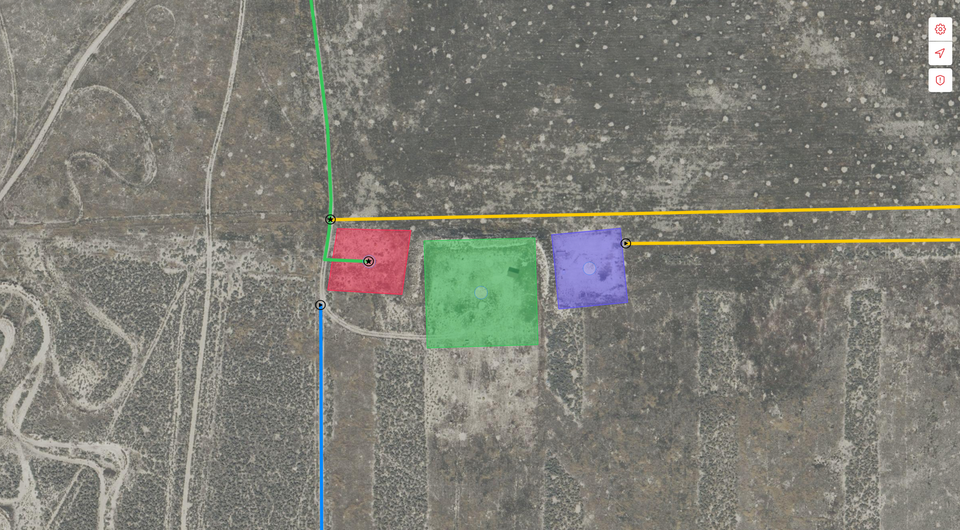
Range Test
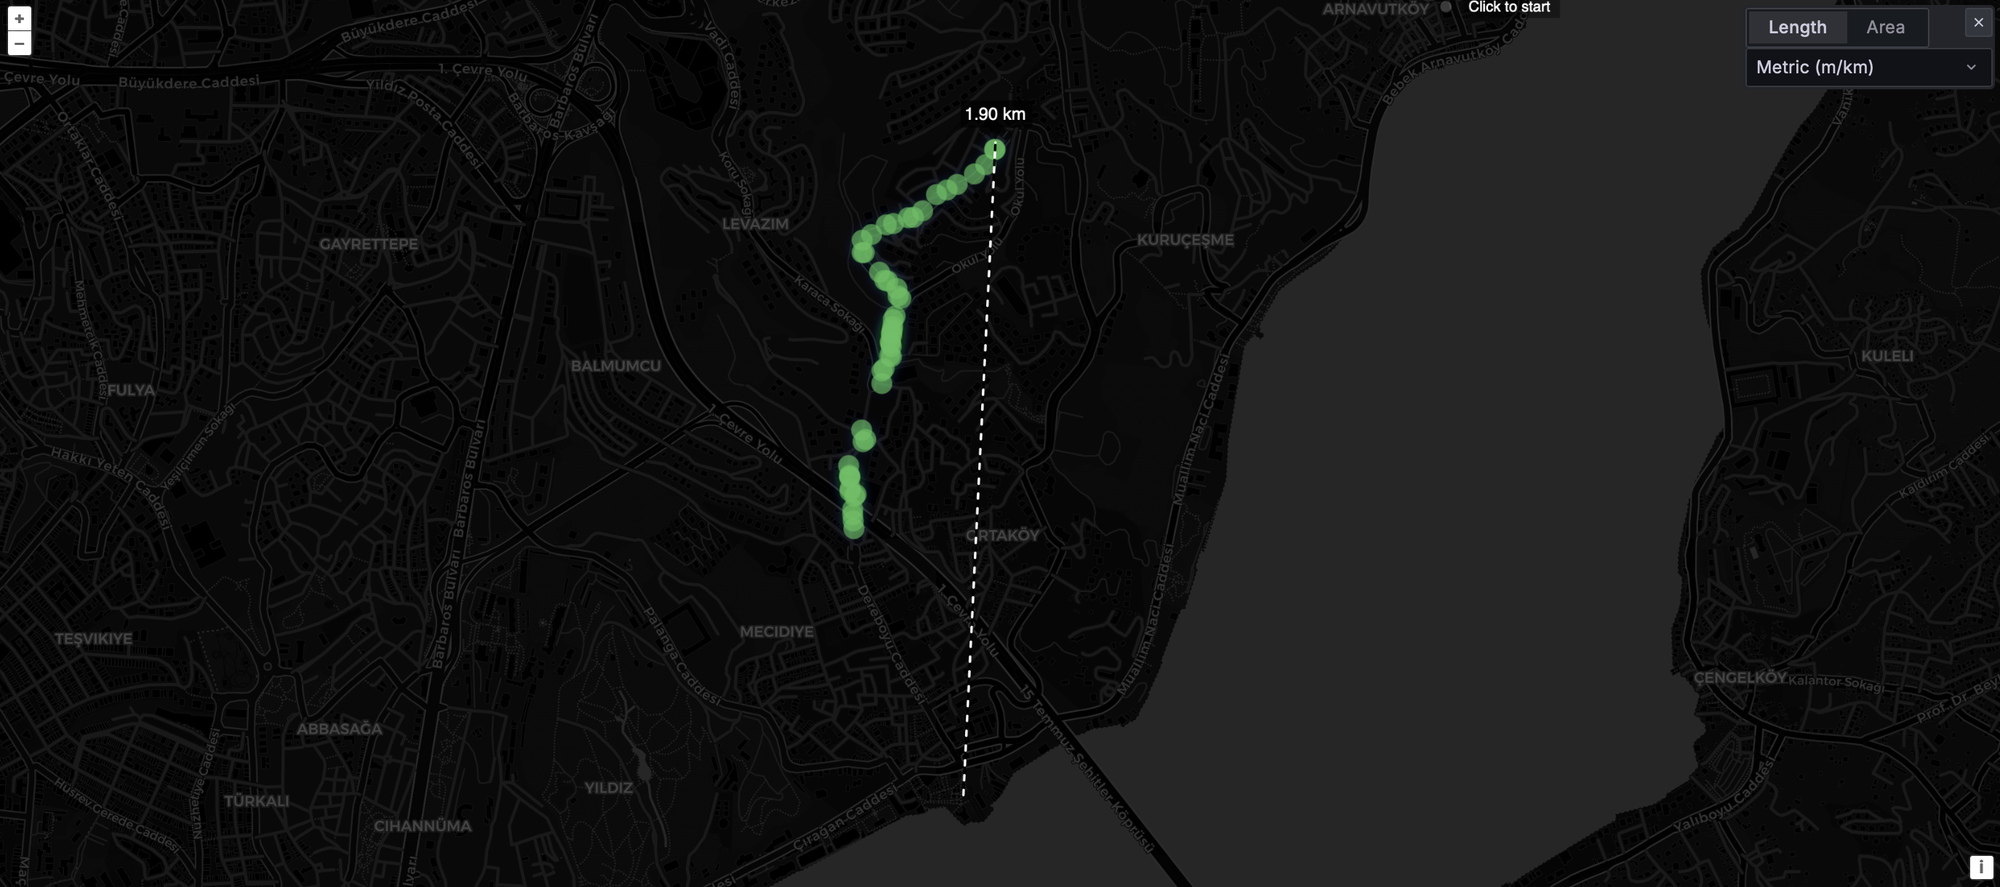
For this test we switched our usual setup. Normally the base station is the T1000-E, but since we reviewed the WisMesh Tag and its signal was excellent, we used it as the fixed base for this test. The Solar Node P1-Pro was the walking unit.
The result was impressive ~1.90km in a dense urban environment, consistent acknowledged packets throughout the route before we called the test off. The signal didn't die gracefully at the edge, it just kept working, which is what you want to see.
Now the honest caveat, because we always say this: take range tests with a grain of salt. These are not scientific, controlled experiments. Environmental variables, building density, elevation changes, and even which direction you're walking all affect results. We've seen the same antenna class perform very differently across tests.
That said, the result is in line with what we've gotten from the T1000-E and WisMesh Tag in similar conditions, and those are two of the best-performing compact Meshtastic devices we've tested. Beyond the ~1.9km consistent range, there were some extra packets that made it through at greater distance, but those were sporadic rather than reliable. Consider the consistent range the real number.
One thing worth flagging: we tested the SenseCAP Indicator previously, which uses the same 2dBi antenna class, and got noticeably worse range. It's possible the Indicator's base was a T1000-E that was limiting things, or there were environmental variables we couldn't control. The stock antenna quality on these devices may also not be perfectly consistent batch to batch. We've seen that pattern before.
What this means practically: the stock 2dBi antenna performs fine and you don't necessarily need to swap it right away. The range is competitive with the best compact Meshtastic devices we've tested. But, and this is the solar node specific point, if you're going to mount this somewhere hard to access, like on a roof or high up a pole, do the antenna upgrade before you mount it. Swapping an antenna on a device you can reach is easy. Doing it 4 meters up a pole is not.
What to Know Before You Buy
The antenna right away. As we saw in the range test, the stock 2dBi performs competitively with the best compact Meshtastic devices we've tested. So don't feel like the device is handicapped out of the box. That said, 2dBi is what virtually every solar node ships with at this price point, even the RAK WisMesh Repeater at $300 ships with a basic antenna, which at that price is less forgivable. If you want to push further, the SMA connector and included RF cable make upgrading easy. Seeed themselves recommend the 3dBi 860–930MHz fiberglass as the logical next step, or the 5.8dBi 902–928MHz fiberglass for high-elevation deployments. One user running the 5.8dBi upgrade 43 feet up a tree is pulling consistent 31-mile contacts in Florida. A solar node rewards antenna investment more than any EDC tracker ever will, it's sitting in one spot all day, elevated, and the antenna is the only variable you control after deployment.
USB-C charging is a bigger deal than the spec sheet makes it sound. Already covered above, but worth repeating here as a buying point.
IPX5 rated with a rubber USB-C cover included, with a caveat. Seeed does publish an IPX5 rating for this device, which covers sustained water jets, good enough for rain. The limiting factor is the USB-C port: IPX5 doesn't cover dust ingress at all (that requires an IP6X dust rating). If you're deploying in a dusty environment, a small piece of tape over the USB-C port when it's not in use solves that entirely. Simple fix, worth knowing."
Button-top 18650s only for replacement. Flat-top cells won't make reliable contact with the holder. File that away.
The GPS is for timing, not tracking. This is a fixed node. GPS earns its place through mesh timing synchronization, not position reporting. If you want a moving asset tracker, this is the wrong device.
Don't use NRF-OTA for firmware updates. Use the Web Flasher. Flash erase firmware first. This is in Seeed's documentation and it's worth taking seriously.
Final Verdict
The SenseCAP Solar Node P1-Pro is the best value solar Meshtastic node you can buy right now.
Nine-plus days of battery runtime with zero solar input. A 5W panel that keeps it running indefinitely under real outdoor conditions. Four 3350mAh cells included. USB-C backup charging. A mounting system, specifically that bracelet-clasp hoop ring, that is genuinely better than what most devices bundle at this price or higher. Grove sensor expansion that can turn it into a mesh-connected weather station. Pre-flashed, ready to pair, FCC and CE certified.
The trade-offs are: no official IP rating, 2dBi stock antenna you'll want to upgrade, internal sensor placement and somehow a way to brick it if not careful (seriously seeed studio this is second device with same issue!), None of these are dealbreakers.
At $89.90 it is hard to find something to hate it for, this is the T1000-E play all over again. Seeed Studio found the price where everyone else's argument falls apart. If you're building out your mesh network and you need a permanent solar node that just works, this is where you start.
If you want the bare bones version without batteries and GPS to keep costs down or use your own parts, the P1 at $69.90 is the same device with more flexibility.