No More Meshtastic MQTT. The Flaresat Relay Bridge Does It Better, Safer, and in Seconds.
Stop fighting with MQTT brokers and zero-hop limits. The Flaresat Relay Bridge instantly connects your off-grid Meshtastic mesh to anyone online in seconds. Get real-time, bidirectional sync for live maps, pins, routes, and chat using just your phone's internet, no server infrastructure needed.
Stop configuring MQTT brokers. Stop fiddling with uplink and downlink toggles. Stop depending on a public server with a zero-hop policy that barely works. The Flaresat Relay Bridge gives you live, bidirectional sync between your off-grid mesh and anyone online, in about 20 seconds.
The MQTT Problem
If you've tried to bridge your Meshtastic mesh to the internet, you know the path. Enable the MQTT module, configure uplink and downlink per channel, point everything at a broker, and hope it holds together.
Meshtastic does support this, and it's gotten better over time. Firmware 2.3.2 added MQTT Client Proxy mode, which lets your radio tunnel through your phone's internet connection instead of needing Wi-Fi on the device itself. That was a real improvement, nRF52 nodes, and anything without built-in Wi-Fi can now use MQTT through your phone.
But the core problems didn't go away.
The public broker has a zero-hop policy. Any data injected back from the internet doesn't propagate further than the directly connected gateway node. If you have a multi-hop mesh and you want remote data to actually spread across it, the public broker won't do it. Directly connected nodes get it. Everyone else doesn't.
The public broker is shared infrastructure. Your team's positions and messages pass through a community-maintained server under Meshtastic's data handling. It's not yours, it's not private, and it's rate-limited to protect the broader network.
A private broker means infrastructure you own and maintain. Mosquitto on a VPS, TLS certificates, port forwarding, broker authentication, uptime responsibility. If you want real privacy and reliable throughput, this is the path. It's doable, but you're now running a server to relay mesh packets.
Uplink and downlink are configured per channel and easy to miss. This is the most common failure mode. Everything looks configured. Nothing flows. Because someone forgot to toggle uplink on the primary channel, or toggled it and didn't tap save, or saved but didn't push to the radio. Zero-feedback failure.
Here's what the full MQTT setup actually looks like:
- Open the Meshtastic app → Settings → MQTT
- Toggle MQTT Enabled
- Toggle Proxy to Client Enabled (if using your phone's connection instead of device Wi-Fi)
- Set broker address, username, password
- Go to each channel you want bridged → enable Uplink and Downlink → save → push to radio
- Verify the broker is receiving packets (mosquitto_sub, MQTT Explorer, or similar)
- Figure out what to do with raw ServiceEnvelope protobufs on the other end
For Home Assistant dashboards, Node-RED automations, or custom integrations that consume raw mesh data, this is exactly the right tool. The format is documented, the Python library is solid, and the developer ecosystem around it is good.
For field coordination where you just need your remote teammate to see a live map, it's a lot of stack for the outcome.
What the Relay Bridge Does Instead
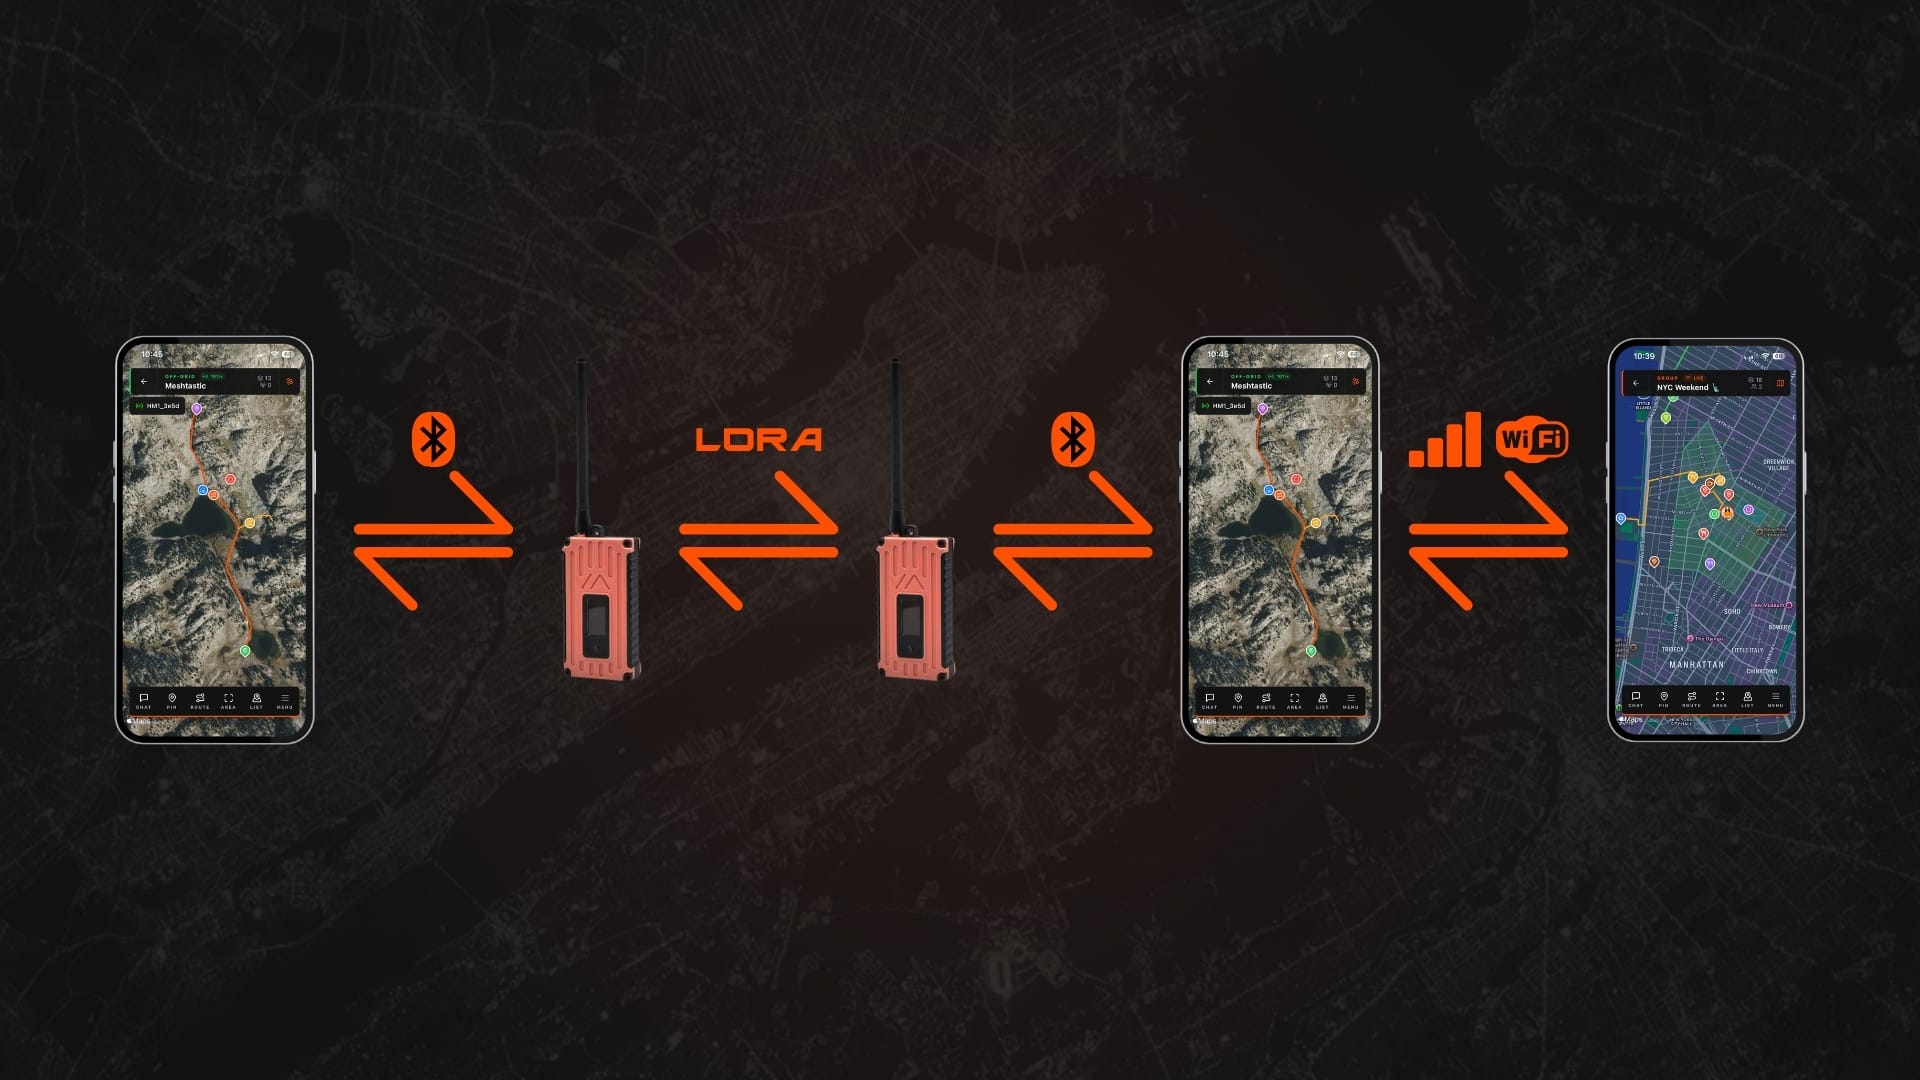
Flaresat's off-grid mode already uses your Meshtastic radio as a transport layer for a live group map. Pins, routes, areas, chat, everything syncs over LoRa to every member of the group. No internet, no servers. If you haven't read how the off-grid side works, start there first.
The Relay Bridge is the feature that connects that off-grid group to a cloud group, in both directions, live.
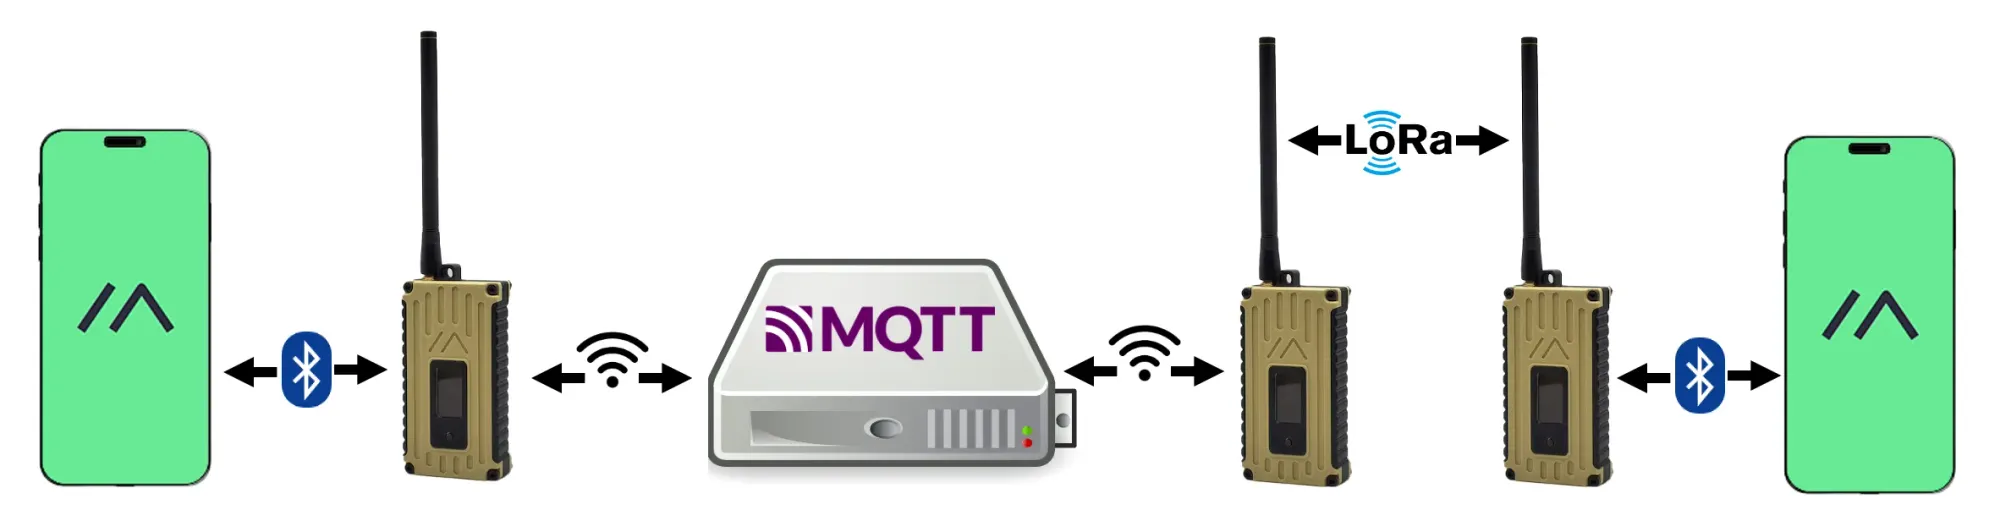
One person on your team has cell signal or Wi-Fi. Maybe they're at the vehicle. Maybe they're at the trailhead. Maybe they're the last person with a bar of LTE before everyone else drops into a canyon. That person runs the bridge. Everything the mesh does shows up in the linked cloud group. Everything added to the cloud group transmits over LoRa to the field team.
| Direction | What syncs |
|---|---|
| Mesh → Cloud | Pins, routes, areas, messages from off-grid devices appear live in the cloud group |
| Cloud → Mesh | Cloud pins, routes, areas, messages transmit over LoRa to all off-grid devices |
Style changes, edits, and deletions sync both ways. Voice notes are the one exception, those don't relay.
The bridge device is the phone that person already has. Connected over Bluetooth to the radio. Connected over cell or WiFi to the internet. When coverage drops, sync pauses. When it comes back, it resumes automatically.
Setting Up the Relay Bridge
This assumes you already have an off-grid group and a cloud group set up in Flaresat. If you don't, the Flaresat getting started guide covers that in about 2 minutes.
- Open your off-grid group on the device that has connectivity, the person at the vehicle, the trailhead, wherever signal exists.
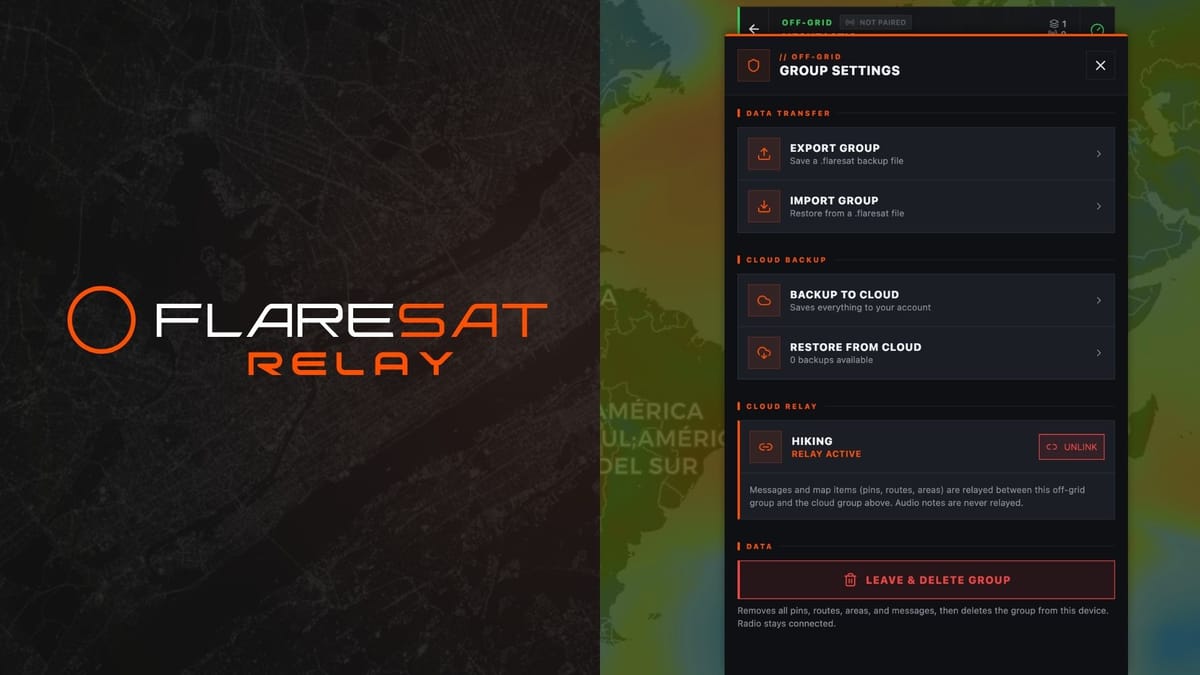
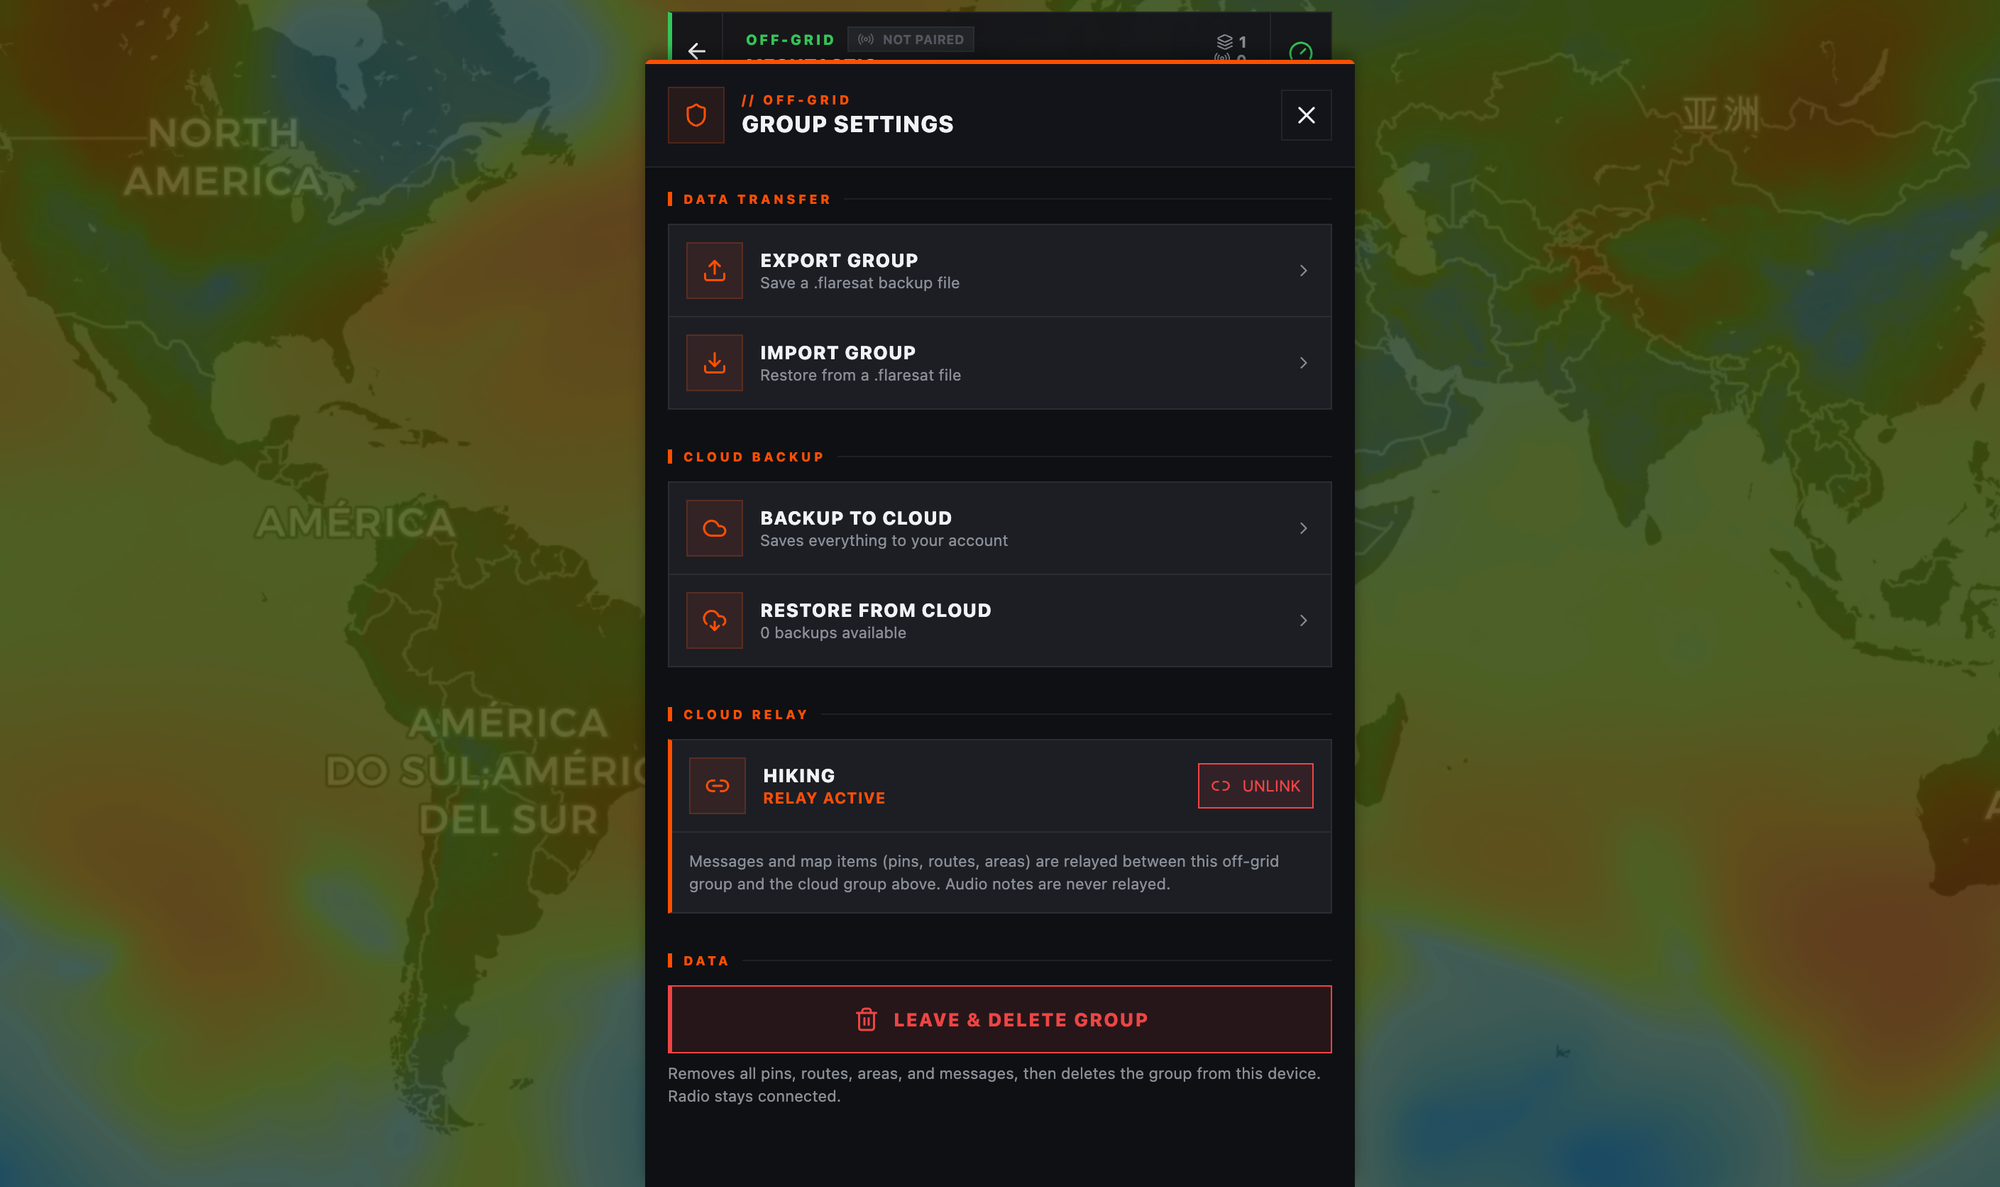
- Tap the Menu icon in the bottom right, go to Settings, scroll to the Cloud Relay section.
- Select the cloud group you want to link. Your existing cloud groups are listed. Tap the one you want and confirm. You need to already be a member of it.
- Relay is live. From this point, the off-grid mesh and the cloud group are synced in real time.
To stop it: Group Settings → Unlink Cloud Group → confirm. Unlinking doesn't delete anything that already synced, it just stops the live connection.
One important thing: multiple people can run the bridge at the same time. If three people on your team have signal and all three have relay active, there are no duplicates and no loops. Flaresat uses deterministic ID derivation, every bridge device generates the same mesh ID for the same cloud item, so the mesh deduplicates at the network layer. Cloud-originated packets are tagged to prevent re-relay. More bridge devices means more redundancy. Don't overthink it.
Why This Is Different
| Meshtastic MQTT | Flaresat Relay Bridge | |
|---|---|---|
| Broker required | Yes (public or self-hosted) | No |
| Works on nRF52 | Yes (via Client Proxy) | Yes |
| Wi-Fi on device needed | Only for gateway mode | No |
| Zero-hop limitation | Yes (public broker) | No |
| Per-channel config | Uplink + downlink per channel | Select channel once in group settings |
| Multi-bridge redundancy | Manual coordination needed | Built-in, automatic |
| What you see on the other end | Raw protobufs / MQTT topics | Live map in a browser |
| Setup time | 15–30 min (first time) | ~20 seconds |
No zero-hop limitation. The bridge device is a full mesh participant. Data from the cloud enters the mesh at that device and propagates normally. It's not injected via a broker with hop restrictions baked in.
Works on any hardware. The bridge capability lives in the Flaresat app, not the radio firmware. ESP32, nRF52, anything, doesn't matter. No Wi-Fi on the device needed.
The destination is already built. Your remote teammate opens app.flaresat.com in a browser, opens the cloud group, and sees the live map. That's it. No MQTT client to set up on their end. No protobuf decoding. No additional tooling.
The Right Tool for the Job
MQTT is genuinely the right choice if you're building developer integrations, Home Assistant, Node-RED, custom telemetry pipelines. The ecosystem is solid, the format is documented, and nothing else comes close for that use case. Keep using it.
But field coordination isn't a developer integration problem. It's a people problem. Your team needs to know where each other are, share a route, drop a pin on a hazard, and do it without an IT project standing between them and the map.
The Relay Bridge doesn't replace your infrastructure, it means you don't need any. One person with signal. One setting in the app. Everyone else in the field gets a live, synced map the moment it's active, and your remote teammate sees the same picture from a browser tab anywhere in the world.
Download on iOS · Download on Android · Open the Web App · Relay Bridge Docs