How To Set Up Your MacBook For Power Users & Developers (2026 Complete Guide)
The complete MacBook setup guide for power users and developers in 2026. From Homebrew to iTerm2, bash, Git, window management and the essential apps that transform a fresh macOS install into a productivity machine." tags: Guides, Tech, Productivity

A fresh macOS install out of the box is fine. But "fine" is not what we want. With the right tools, settings, and a couple of hours of setup, you can turn that brand new MacBook into a serious productivity and development machine that fits the way you actually work.
Why Bother Customizing macOS at All?
The default macOS experience is built to be safe and approachable for the average user. That is great if you only need a browser and Mail.app, but as soon as you start coding, managing files at scale, or doing anything that involves more than two open windows at a time, the cracks start to show.
No Built-In Package Manager Installing developer tools is painful by default. You end up downloading random .dmg files from random websites with no easy way to keep them updated.
Weak Window Management macOS still has no proper tiling or snap-to-edge keyboard shortcuts out of the box. For anyone coming from Windows or Linux, this feels like a step backward.
Slow App Launcher Spotlight is fine for finding files, but it is slow and prioritizes web results over the apps you actually want to launch.
Bare-Bones Terminal The built-in Terminal works, but it is missing clickable links, native notifications, modern key bindings, and the customization you need to live in the shell.
Privacy Compromises The default browser, default search engine, and default settings are not built around privacy. If you care about who tracks you across the web, the defaults won't cut it.
The good news, every single one of these gaps can be fixed with free, open-source tools that take minutes to install. Let's get into it.
Step 1: Install Homebrew (The Package Manager)
Homebrew is the missing package manager for macOS. It lets you install, update, and remove command-line tools and full applications from a single terminal command. If you only do one thing from this guide, do this.
Why Homebrew is Essential
- One-Line Installs: Install almost any tool with
brew install <name>instead of hunting for.dmgfiles - Updates in Bulk: Update everything you've installed with
brew upgrade - Easy Removal:
brew uninstallcleans up properly, no leftover files - Casks for Full Apps: Install full GUI apps (VS Code, Discord, VLC) the same way you install command-line tools
- Repeatable Setup: Wiping and reloading your Mac becomes a 10-minute script instead of a 2-hour ordeal
Installation
Open the built-in Terminal app (Spotlight → "Terminal") and paste:
/bin/bash -c "$(curl -fsSL https://raw.githubusercontent.com/Homebrew/install/HEAD/install.sh)"
This will also install the Xcode Command Line Tools, which a lot of developer tools need to compile. The whole thing takes a few minutes.
eval "$(/opt/homebrew/bin/brew shellenv)" to your shell profile. Skip this and brew won't be on your PATH.To confirm it worked:
brew --version
Step 2: Replace the Built-In Terminal with iTerm2
The default Terminal is functional but ancient. iTerm2 is the terminal replacement most macOS power users have been running for over a decade, and it is still the best choice in 2026.
Why iTerm2?
- Clickable Links: Cmd+Click a URL and it opens in your browser
- Native Notifications: Get a system notification when a long-running command finishes
- Better Customization: Themes, fonts, key mappings, status bar widgets
- Split Panes: Multiple shells in the same window, side by side
- Search: Full-text search through your terminal scrollback
- Window Chrome: Just looks nicer than the built-in Terminal
Install It
brew install --cask iterm2
Launch it and let's get the settings dialed in.
Recommended iTerm2 Settings
Open iTerm2 → Settings (Cmd+,) and walk through these:
Appearance
- Theme → Minimal (gets rid of the chunky window chrome)
Profiles → Default → General
- Working Directory → Reuse previous session's directory (new tabs open in the same folder)
Profiles → Default → Colors
- Foreground → Lime Green (or whatever you like, but high contrast helps)
Profiles → Default → Text
- Font → Anonymous Pro (free and clean, download here)
- Font Size → Whatever fits your screen, 14-16pt for daily use, larger if you stream or present
Profiles → Default → Keys
- Key Mappings → Presets → Natural Text Editing
- This gives you Option+Arrow to jump words, Cmd+Backspace to delete a line, all the keyboard shortcuts you already know from every other macOS app
Step 3: Set Up Your Shell
macOS ships with zsh as the default shell. You have two paths here:
| Shell | Best For | Setup |
|---|---|---|
| zsh + Oh My Zsh | Beginners, anyone who wants a great shell out of the box | Easy, one-line install |
| bash | Anyone working on remote Linux servers, sysadmins, shell scripters | More setup, but consistent with most servers |
If you spend most of your time SSH-ing into Linux boxes, bash will feel more familiar because that is what most servers run. If you mostly code locally, stick with zsh + Oh My Zsh, it is great.
Option A: zsh with Oh My Zsh (Recommended for Most People)
Oh My Zsh is a community-driven framework for managing your zsh configuration. It gives you themes, plugins, auto-completion, and a much nicer prompt out of the box.
sh -c "$(curl -fsSL https://raw.githubusercontent.com/ohmyzsh/ohmyzsh/master/tools/install.sh)"
After install, edit ~/.zshrc and change the theme line:
ZSH_THEME="agnoster"
There are over 100 built-in themes. agnoster, powerlevel10k, and robbyrussell (the default) are the most popular.
Useful plugins: Edit the plugins=(...) line in ~/.zshrc and add:
plugins=(git brew node npm docker macos zsh-autosuggestions zsh-syntax-highlighting)
For zsh-autosuggestions and zsh-syntax-highlighting (the two best plugins), install them first:
brew install zsh-autosuggestions zsh-syntax-highlighting
Option B: bash with Oh My Bash
If you prefer bash, you need to install a newer version (macOS ships with an ancient one for licensing reasons):
brew install bash
Find where bash got installed:
which bash
Add the path to /etc/shells:
sudo nano /etc/shells
Add /usr/local/bin/bash (or /opt/homebrew/bin/bash on Apple Silicon) on its own line, save with Ctrl+X then Y.
Set it as your default:
chsh -s /usr/local/bin/bash
Then install Oh My Bash for the same kind of customization Oh My Zsh gives you:
bash -c "$(curl -fsSL https://raw.githubusercontent.com/ohmybash/oh-my-bash/master/tools/install.sh)"
echo $SHELL.Step 4: Install the Latest Git and Configure It
macOS comes with git, but it is often a few versions behind. Get the latest:
brew install git
git --version
Now configure your name, email, and default editor (this is what shows up in commits):
git config --global user.name "Your Name"
git config --global user.email "[email protected]"
git config --global core.editor nano
git config --global init.defaultBranch main
git config user.email inside each project folder to override the global setting on a per-repo basis.Set Up SSH Keys for GitHub
This is the thing everyone skips and then regrets the first time they try to push.
ssh-keygen -t ed25519 -C "[email protected]"
Hit enter through the prompts (the defaults are fine). Then copy your public key to clipboard:
pbcopy < ~/.ssh/id_ed25519.pub
Paste it into GitHub → Settings → SSH and GPG keys → New SSH key. Done. No more password prompts when pushing.
Step 5: Essential Command-Line Tools
A handful of CLI tools you will use constantly. Install them all in one go:
brew install ffmpeg imagemagick wget jq tree htop tldr fzf bat eza
What each one does:
- ffmpeg - Edit, convert, compress video/audio from the command line
- imagemagick - Same thing but for images
- wget - Download files (curl is built in but wget is friendlier)
- jq - Process and query JSON in the terminal
- tree - Show directory structure as an indented tree
- htop - Better
top, see what is eating your CPU and RAM - tldr - Crowdsourced cheat sheets for any command (
tldr tarbeatsman tarevery time) - fzf - Fuzzy finder for files, command history, anything
- bat -
catwith syntax highlighting and line numbers - eza - Modern
lsreplacement with colors and icons
Step 6: OS Productivity Tools (The macOS Gaps)
These are the tools that fix what macOS should do out of the box but does not.
Window Management - Rectangle
macOS still has no proper window snapping. Rectangle fixes this with the keyboard shortcuts every Windows user already knows (Ctrl+Alt+Arrow to snap, etc.).
brew install --cask rectangle
Open it, allow Accessibility access, and your windows finally behave. Cmd+Option+Left to snap left half, Cmd+Option+Right for right half, Cmd+Option+Enter to maximize.
App Switcher - AltTab
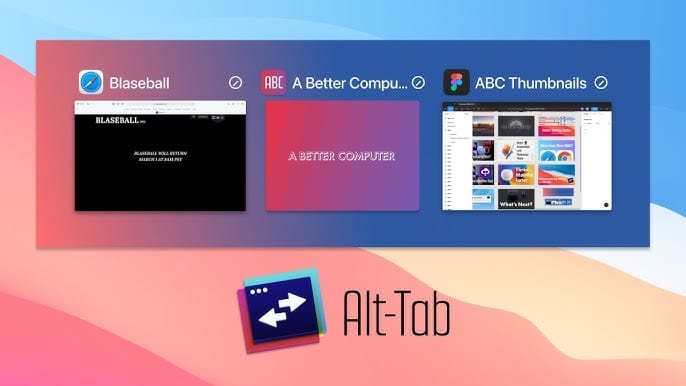
The built-in Cmd+Tab switcher only shows app icons and treats all windows of the same app as a single entry. AltTab brings the Windows-style Alt+Tab to macOS with proper window previews.
brew install --cask alt-tab
In its settings, remap it to Cmd+Tab to replace the macOS default. You will never go back.
Quick Launcher - Alfred or Raycast
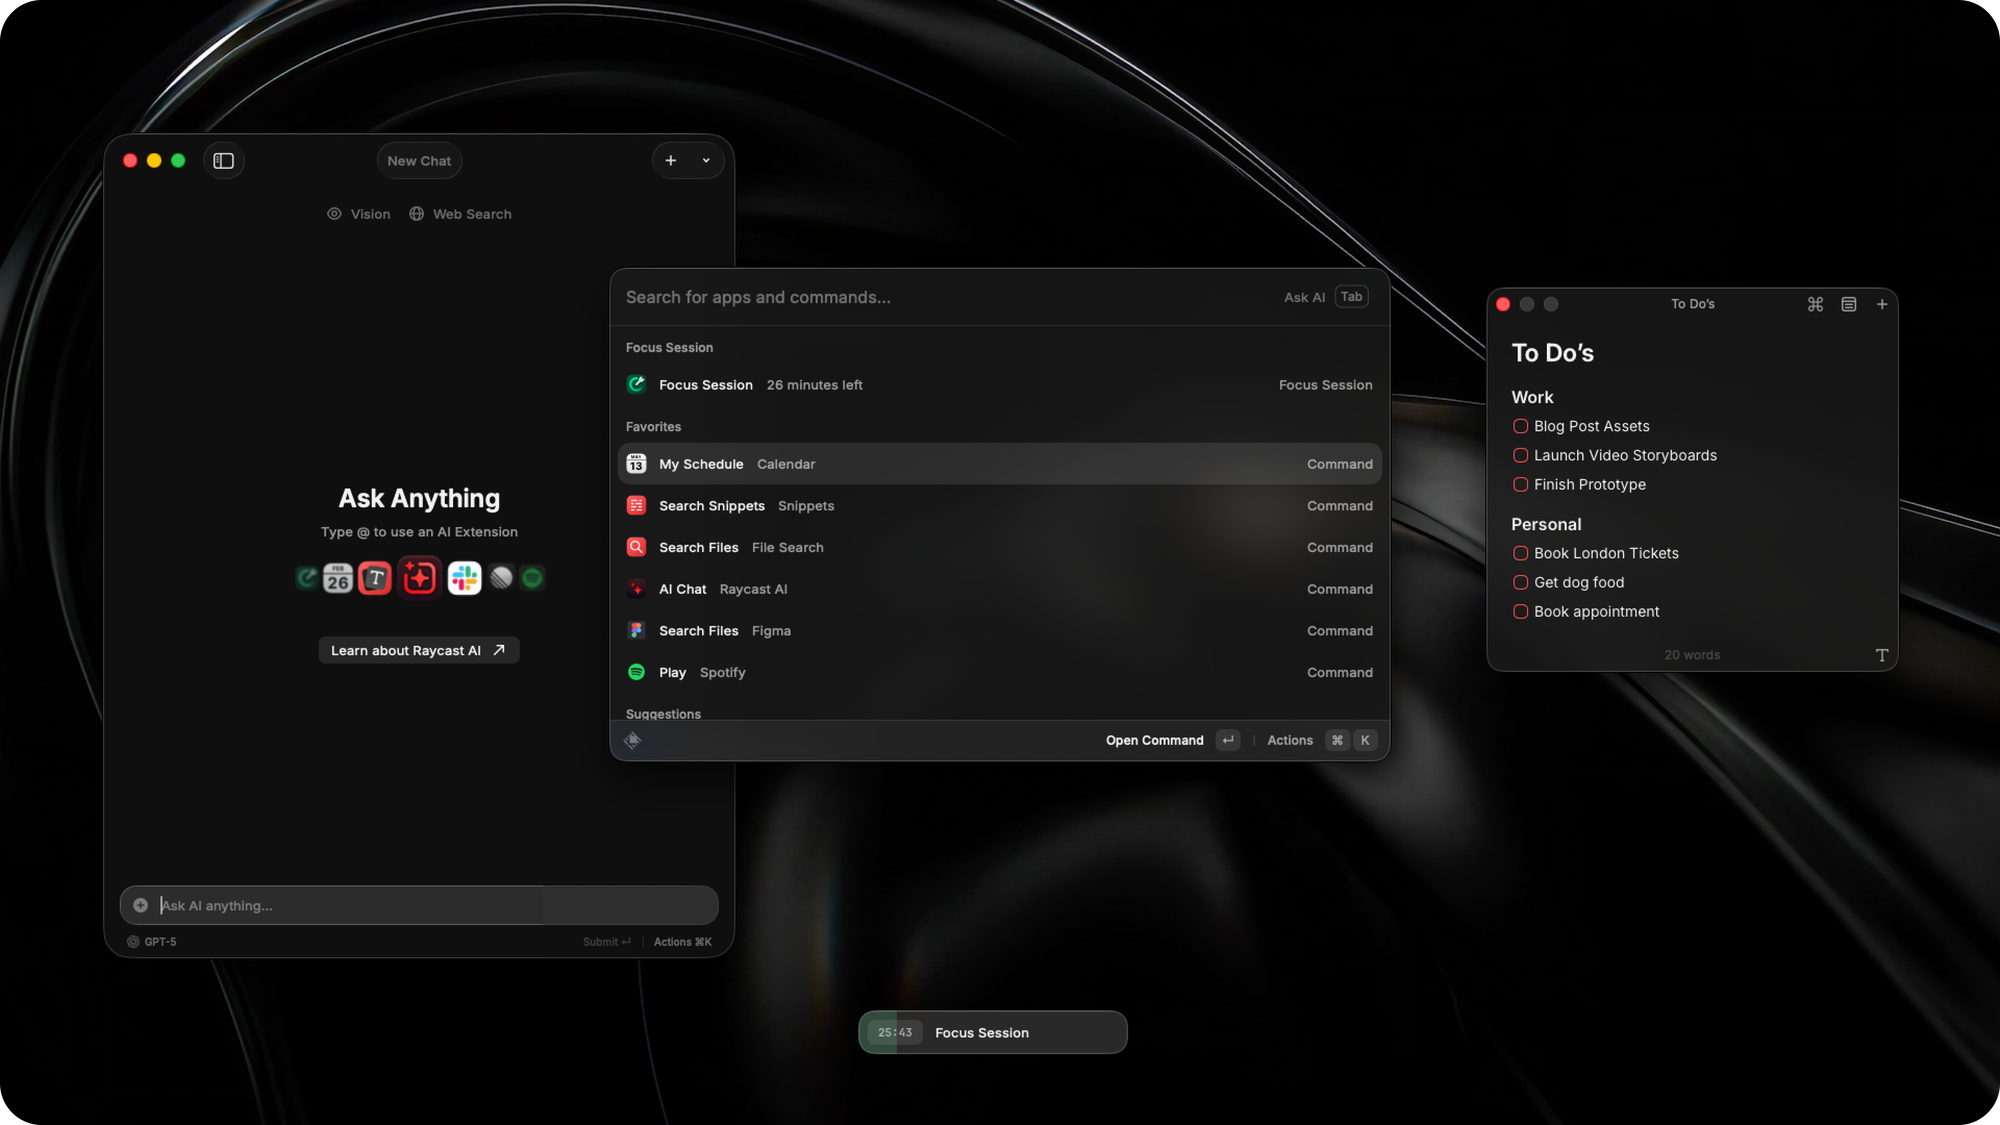
Spotlight is slow and full of web results. Pick one of these instead.
Alfred - The classic. Free for app launching, paid Powerpack adds workflows, clipboard manager, snippets.
brew install --cask alfred
Raycast - The modern alternative. Free, faster, built-in clipboard manager, window management, calculator, and a huge plugin store.
brew install --cask raycast
In 2026, Raycast is the one most developers reach for. It replaces Alfred, Rectangle, a clipboard manager, and a notepad in one app. If you are starting fresh, start with Raycast.
Speech-to-Text - Hex

Typing is fine. Talking is faster. Hex is an open-source, hold-to-talk dictation utility for Apple Silicon Macs that transcribes your voice locally and pastes the result into whatever app you are currently typing in. No cloud, no subscription, no data leaving your machine.
Why Hex Over the Built-In macOS Dictation:
- Local transcription using Parakeet TDT v3 (default) or WhisperKit, both run on-device via the Neural Engine
- Press-and-hold a global hotkey to record, release to transcribe, the text gets pasted wherever your cursor is
- Works in any app - Slack, VS Code, Notes, the browser address bar, anywhere
- Multilingual out of the box, no need to swap dictation languages
- Free and open source, unlike VoiceInk or other paid alternatives
brew install --cask kitlangton-hexor grab the source from GitHub.
On first launch, Hex will ask for Microphone permission (to record your voice) and Accessibility permission (to paste the transcribed text). Grant both. Then set a global hotkey under its settings, something like Right Option works well because you rarely use that key for anything else.
Once you have a comfortable hotkey set up, dictating a 200-word Slack message or a long commit message takes seconds. It is the kind of upgrade you don't realize you needed until you have used it for a week.
Step 7: Essential Daily Apps
Install these all at once with Homebrew casks. Copy this list into a file called apps.txt:
firefox
google-chrome
visual-studio-code
discord
slack
vlc
keka
kap
appcleaner
keepingyouawake
sublime-text
insomnia
gimp
inkscape
spotify
obsidian
Then run:
xargs brew install --cask < apps.txt
What each one is for:
- Firefox - Primary browser (privacy reasons, more on this below)
- Chrome - For when something only works in Chromium
- VS Code - Code editor, configured in Step 9
- Discord / Slack - Community / work chat
- VLC - Plays every video format that exists, unlike QuickTime
- Keka - Handles .rar, .7z, .tar, and every archive format macOS can't open natively
- Kap - Open-source screen recorder, exports to GIF / MP4 / WebM
- AppCleaner - Drag an app onto it to fully uninstall, including config files Mac usually leaves behind
- KeepingYouAwake - One-click menu bar toggle to prevent your Mac from sleeping (great for presentations, downloads, builds)
- Sublime Text - Lightweight text editor, great for notes and quick file edits
- Insomnia - REST / GraphQL API tester (Postman alternative)
- GIMP / Inkscape - Free Photoshop and Illustrator alternatives
- Obsidian - Markdown-based note taking with a graph view
brew install --cask installs full GUI apps. brew install (no --cask) installs CLI tools. If you get an error, you usually have the wrong one.Step 8: macOS System Settings
A few macOS defaults are objectively bad. Fix them.
Finder
Open Finder → Settings (Cmd+,):
- General → Show these on the desktop → Deselect everything (keep the desktop clean)
- General → New Finder windows show → Home folder (more useful than "Recents")
- Advanced → Show all filename extensions → ON (always know what you are clicking)
- Advanced → Show warning before changing an extension → OFF (annoying)
- Advanced → When performing a search → Search the current folder (Spotlight already does global)
In Finder's View menu, enable:
- Show Status Bar
- Show Path Bar
- Show Tab Bar
Dock
The Dock takes up screen real estate. With Raycast/Alfred handling app launching and AltTab handling switching, the Dock has no real job.
- System Settings → Desktop & Dock
- Size → As small as possible
- Position on screen → Right (vertical space is more valuable than horizontal on a widescreen laptop)
- Automatically hide and show the Dock → ON
Trackpad
- System Settings → Trackpad → Point & Click
- Tap to click → ON
- Tracking speed → Faster than you think you want
- System Settings → Trackpad → More Gestures
- App Exposé → ON (three-finger swipe down)
- Mission Control → ON (three-finger swipe up)
Keyboard
- System Settings → Keyboard
- Key repeat rate → Fast
- Delay until repeat → Short
These two settings make holding down a key (to navigate cursor, delete, etc.) feel snappy instead of laggy.
Spotlight (Optional, if not using Raycast)
If you do not switch to Raycast/Alfred, at least turn off the web junk:
- System Settings → Spotlight → Search Results → Uncheck Siri Suggestions, Bing Web Results, anything you do not actually search for
Step 9: Customize the Menu Bar
System Stats - Stats
Stats is a free, open-source menu bar app that shows CPU, RAM, GPU, network, battery, and disk usage at a glance. It replaces the paid iStat Menus.
brew install --cask stats
In its settings, for each widget, look for "Widget Settings → Merge widgets into one" to keep things compact.
Calendar in the Menu Bar - Itsycal
The system clock does not show a calendar. Itsycal puts a tiny calendar in the menu bar that pulls from your macOS Calendar.
brew install --cask itsycal
To avoid duplicating the date, hide the system clock date:
- System Settings → Control Center → Clock Options
- Show Date → Never
- Show Day of Week → Off
Step 10: Browser Privacy with Firefox
The defaults of any browser are not built around privacy. Firefox + a handful of extensions is the easiest way to drastically reduce tracking. For a deeper dive on this topic, see our guide on how to stay anonymous and secure online.
Why Firefox?
- Open source and developed by the non-profit Mozilla Foundation
- No ties to ad tech (unlike Chrome, which is built by an advertising company)
- Container tabs for keeping work / personal / social accounts properly isolated
- Strong extension support, including content blockers that actually work
Essential Privacy Extensions
- uBlock Origin - The best ad blocker, full stop. Also blocks trackers.
- Privacy Badger - Algorithmically blocks trackers that follow you across sites
- Cookie AutoDelete - Deletes cookies from sites that aren't on your whitelist when you close their tab
- Decentraleyes - Hosts common CDN resources locally so Google, Cloudflare, etc. can't fingerprint you across the web
- Multi-Account Containers - Mozilla's official container extension, isolate Facebook / Google / work / personal accounts in separate cookie jars
Firefox Settings
In about:preferences#privacy:
- Enhanced Tracking Protection → Strict
- Send websites a Do Not Track signal → Always
- DNS over HTTPS → Max Protection (Cloudflare 1.1.1.1 by default, change to Quad9 if you prefer)
Step 11: Node.js with nvm
Don't install Node.js from the website. Use nvm (Node Version Manager) so you can switch versions per project.
Install nvm
curl -o- https://raw.githubusercontent.com/nvm-sh/nvm/v0.40.1/install.sh | bash
Add this to your ~/.zshrc (or ~/.bash_profile):
export NVM_DIR="$HOME/.nvm"
[ -s "$NVM_DIR/nvm.sh" ] && \. "$NVM_DIR/nvm.sh"
[ -s "$NVM_DIR/bash_completion" ] && \. "$NVM_DIR/bash_completion"
Restart your terminal, then install Node:
nvm install --lts
nvm use --lts
node --version
Useful Global npm Modules
npm install -g pnpm typescript ts-node nodemon http-server lite-server gitignore license
- pnpm - Faster, disk-efficient npm replacement
- typescript / ts-node - TypeScript compiler and runtime
- nodemon - Auto-restart node apps when files change
- http-server / lite-server - Quick static file servers for testing
- gitignore - Generate
.gitignorefiles for any project type (gitignore nodewrites a Node.js gitignore) - license - Generate
LICENSEfiles for open source projects
Step 12: VS Code Setup

VS Code is the default code editor for most developers in 2026. A few settings turn it from "fine" into "fantastic."
Open the Settings JSON
Cmd+Shift+P → "Preferences: Open User Settings (JSON)" and add:
{
  "editor.fontFamily": "Anonymous Pro, Menlo, monospace",
  "editor.fontSize": 14,
  "editor.tabSize": 2,
  "editor.formatOnSave": true,
  "editor.linkedEditing": true,
  "editor.snippetSuggestions": "top",
  "editor.minimap.enabled": false,
  "editor.bracketPairColorization.enabled": true,
  "editor.guides.bracketPairs": "active",
  "files.trimTrailingWhitespace": true,
  "files.insertFinalNewline": true,
  "workbench.startupEditor": "none",
  "terminal.integrated.fontSize": 13,
  "explorer.confirmDelete": false
}
The key ones:
- editor.linkedEditing - Editing an opening HTML tag auto-edits the closing tag
- editor.formatOnSave - Auto-format files (Prettier, Black, etc.) on every save
- editor.snippetSuggestions: "top" - Snippets show up at the top of autocomplete instead of buried
Install the code Command in Terminal
Cmd+Shift+P → "Shell Command: Install 'code' command in PATH"
Now you can open any folder in VS Code from the terminal:
code .
Essential Extensions
- Prettier - Opinionated code formatter
- ESLint - JavaScript / TypeScript linter
- GitLens - Supercharges the built-in Git integration
- Error Lens - Shows linter errors inline next to the offending line
- Path Intellisense - Autocompletes file paths
- Auto Rename Tag - Renames matching HTML/JSX tags together
- GitHub Copilot (paid, or use Continue for free with local LLMs)
- Live Server - One-click local server for static HTML projects
- Material Icon Theme - Better file icons in the explorer
- One Dark Pro or Dracula - Most popular dark themes
Install them all from the command line:
code --install-extension esbenp.prettier-vscode \
     --install-extension dbaeumer.vscode-eslint \
     --install-extension eamodio.gitlens \
     --install-extension usernamehw.errorlens \
     --install-extension christian-kohler.path-intellisense \
     --install-extension formulahendry.auto-rename-tag \
     --install-extension ritwickdey.LiveServer \
     --install-extension PKief.material-icon-theme \
     --install-extension zhuangtongfa.material-theme
Step 13: A Break Timer (Your Eyes Will Thank You)
Sitting in front of a screen for 8+ hours a day is hard on your eyes, your back, and your wrists. A break timer is the kind of tool you think you don't need until you try it for a week.
Time Out is the classic macOS break timer. Stretchly is the cross-platform alternative.
brew install --cask time-out
A good baseline configuration:
- 10-second micro break every 15 minutes (look away, blink, breathe)
- 5-minute long break every hour (stand up, walk away from the screen)
You will resist this for the first two days. By day five it becomes invisible.
Best Practices & Tips
Keep Your Setup Reproducible
The whole point of using Homebrew is that wiping and reloading your Mac becomes painless. To make it even faster:
brew bundle dump --file=~/Brewfile
This writes every installed brew, cask, and Mac App Store app into a Brewfile. Stash that file in a private git repo. Next time you set up a Mac:
brew bundle --file=~/Brewfile
Done. Hours of setup compressed to one command.
Backup Your Dotfiles
Your .zshrc, .bash_profile, .gitconfig, VS Code settings, and Brewfile are your setup. Put them in a git repo (commonly called "dotfiles"). Plenty of public examples on GitHub.
Run macOS Updates Promptly
Apple ships security updates often. Run them as soon as they come in, not three weeks later. System Settings → General → Software Update → Automatic Updates → ON.
Use Time Machine
Yes it is boring, yes you need it. Plug in any external drive and macOS will offer to use it as a Time Machine backup. Do it. The day you accidentally rm -rf something important is the day you will be grateful.
Don't Sign Into Everything With Google / Facebook
It is convenient. It is also a tracking nightmare. Where possible, sign up with email + a password manager (Bitwarden, 1Password) instead of "Sign in with Google".
Troubleshooting Common Issues
brew Command Not Found After Install
You skipped the "Next Steps" instructions Homebrew printed. On Apple Silicon, run:
echo 'eval "$(/opt/homebrew/bin/brew shellenv)"' >> ~/.zshrc
source ~/.zshrc
chsh: /usr/local/bin/bash: non-standard shell
You did not add the new bash path to /etc/shells. Re-run sudo nano /etc/shells and add it.
Rectangle / AltTab Shortcuts Not Working
These apps need Accessibility permission. System Settings → Privacy & Security → Accessibility → Enable each app.
iTerm2 Looks Like a Normal Terminal
You did not pick the Minimal theme. iTerm2 → Settings → Appearance → Theme → Minimal.
code Command Not Working in Terminal
You did not install the shell command. In VS Code, Cmd+Shift+P → "Shell Command: Install 'code' command in PATH."
Slow Boot After Setup
Too many login items. System Settings → General → Login Items and disable anything you don't need on every boot.
Conclusion
A new MacBook is a blank slate. The default macOS experience is fine for a coffee-shop laptop, but with a couple of hours of setup, you can turn it into a serious development and productivity machine that fits your workflow rather than Apple's idea of an average user.
Key Takeaways
- Start with Homebrew. Everything else is downstream of having a real package manager.
- Replace the Terminal. iTerm2 + Oh My Zsh (or bash + Oh My Bash) is night-and-day better than the defaults.
- Fix the macOS Gaps. Rectangle, AltTab, and Raycast solve the three biggest "this should be built in" problems.
- Treat Privacy as a Default. Firefox + uBlock Origin + Privacy Badger costs nothing and dramatically reduces tracking.
- Make It Reproducible. A
Brewfileand a dotfiles repo turn a future Mac setup into a 10-minute job. - Take Breaks. The most powerful productivity tool on this list is the one that tells you to step away from the screen.
Setting up a Mac well is the kind of investment that pays back every single day for years. Spend the afternoon, get it right once, and stop fighting your computer.
Happy hacking! If you have other apps, tools, or settings that earned a permanent spot in your setup, drop a comment below. We're always interested in what other people are running.